Lecture 1: Introduction to the module
In the first week, we got to know what is in store for us with the module. In particular, we got introduced to the module assignment, which is creating a title sequence. We had a look at different kinds of title sequences introduced by students and discussed them. Watching various title sequences, we tried to think about the themes and motifs of title sequences as well as the way they are made.
My favourite title sequence: The Girl With the Dragon Tatto
Lecture 2: Introduction to After Effects
This week, we got introduced to Adobe After Effects user interface, basic animation techniques, shapes layers, and the logic of nested comps.
A useful shortcut list
Click here to check out the most important shortcut keys of After Effects.
My very first motion graphics created in Adobe After Effects
To get my head around the animation workflows and nested comps in After Effects, I tried to create simple motion graphics using shape layers and animation techniques.
Final Render
Workflow
.png)
Added shape layer and animated scale
.png)
Made a new comp and added the square comp to the new one to create nested comp
.png)
Duplicated the square comp and used "Distribute Horizontally" under Align menu
.png)
This is how After Effects aligned the square comps itself
.png)
Trimmed out all the layers with alt + ]
.png)
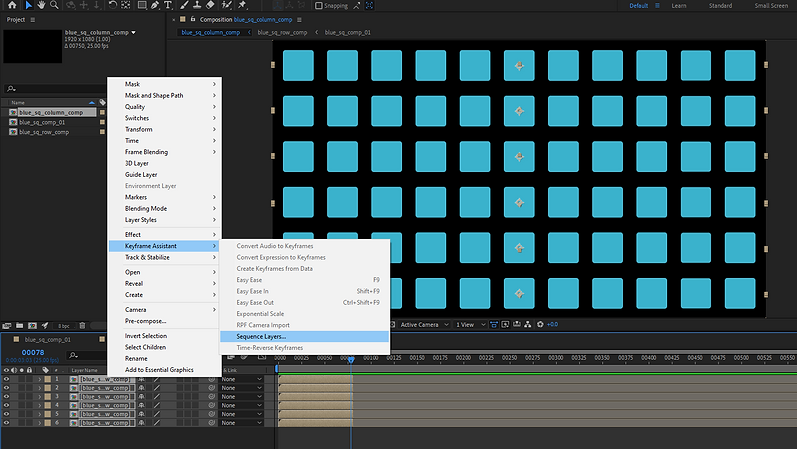
Selected all layers and Rclick -> Keyframe Assistant -> Sequence Layer...
.png)
Then set the duration to an appropriate amount of time
.png)
This is how After Effects carried out "Sequence Layers"
.png)
Made another comp and dragged the square row comp into that and duplicated it
.png)
This is the columns made up of the row comps
.png)
Again, Sequence Layers...
.png)
Set the duration
.png)
Result
.png)
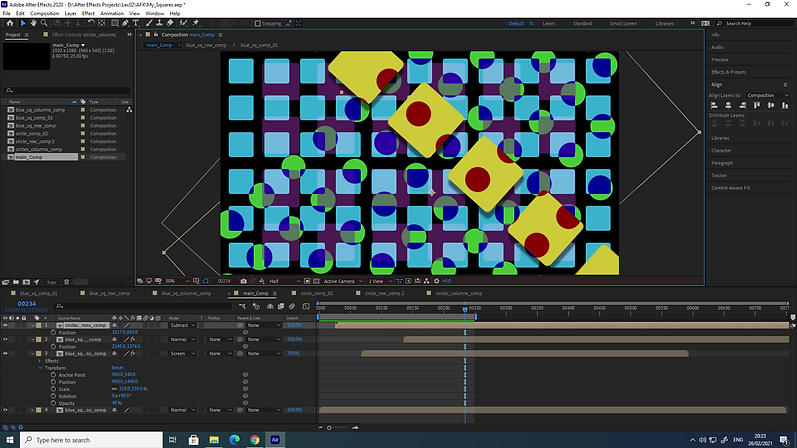
Made another new comp and added the column comps to that, changed the colour with Fill effect
.png)
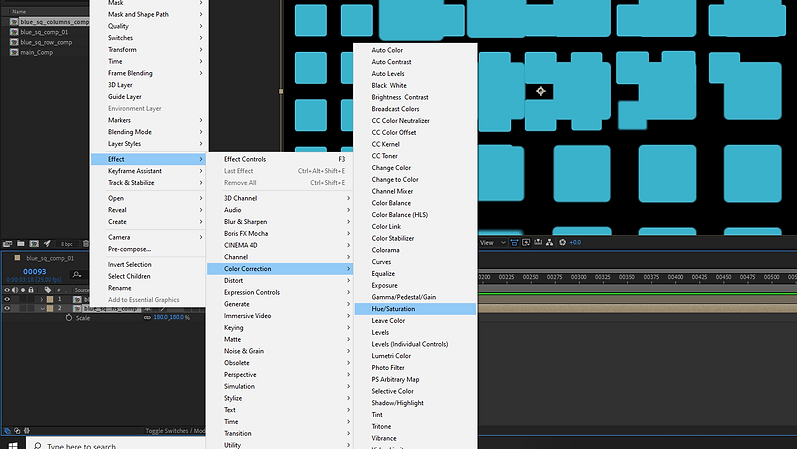
I could also use the Hue/Saturation effect to change the colour
.png)
The result
.png)
Used Deep Shadow effect
.png)
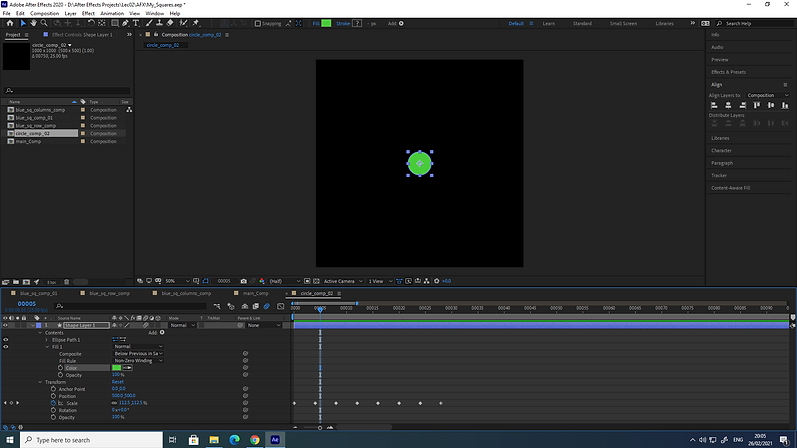
Duplicated the first shape comp and changed the shape and colour of that
.png)
Duplicated the row comp, selected all the layers of that, and then only Alt + dragged the new circle shape comp into the row comp to change the shape of row comp. The keyframes and animation would stay intact after the shape replacement
.png)
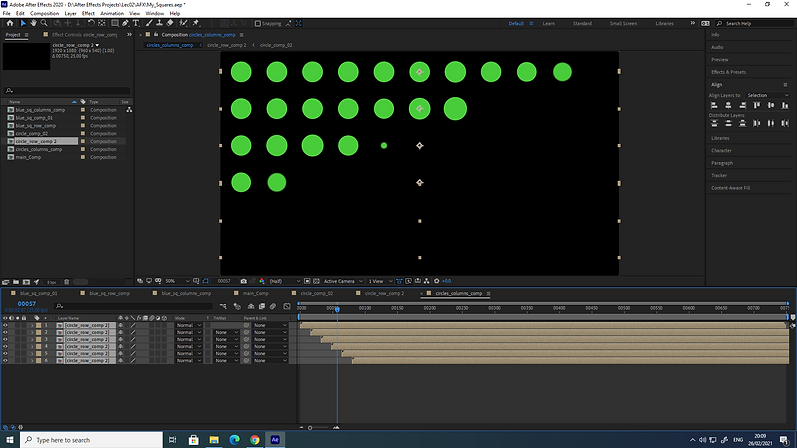
Repeated the previous step, but this time for the column comp
.png)
Added the new column comp to the main comp
.png)
The final result
Lecture 3: After Effects Alphas and Masks
This week, we gained an insight into Alphas and Masks in After Effects. We learnt about the logic behind Alphas, how to layer up images and footage and how to mask out layers using different techniques.
My first attempt to create a title sequence
I tried to get inspiration from the title sequence of True Detective series. Watch it below:
Final renders
Video with sound:
Still:
.jpg)
Workflow
.png)
Imported the image, and created a sold.
.png)
To use luma and cut out the background, I used Curves to increase contrast.
.png)
The result of using "Luma Inverted Matte" for joker
.png)
Cutting out the remnant of the image.
.png)
Used Subtract to cut out.
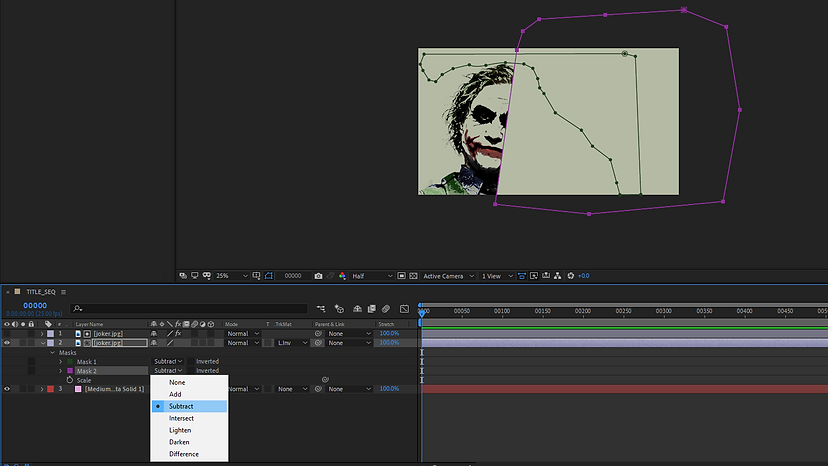.png)
Masking out the image to cut it into half using Subtract.
.png)
Adding Smoke asset and using Subtract blending mode.
.png)
A technique to get rid of sharp edges: add a rectangular mask, use subtract, feather up.
.png)
Increased feather to result in a softer edge.
.png)
Increased feather to result in a softer edge.
.png)
Added another asset, used a different blending mode: Silhouette Luma.
.jpg)
Added a few more assets, used various blending modes and masks. This is the result.
Lecture 4: Introduction to Nuke
This week, we looked at Nuke and got introduced to its interface and a few basic workflows with it. We also got hold of the concept of nodal-based software contrary to layer-based ones like After Effects.
My first attempt to do a green screen job by Nuke and AE
Final Render by Nuke:

Workflow
.png)
Setting up the Project Settings first.
.png)
Changed fps and file format to 25 and HD 1080.
.png)
Added transform node and pressed ctrl to add elbows to tidy up the node graph.
.png)
Added Keylight node to do the green screen.
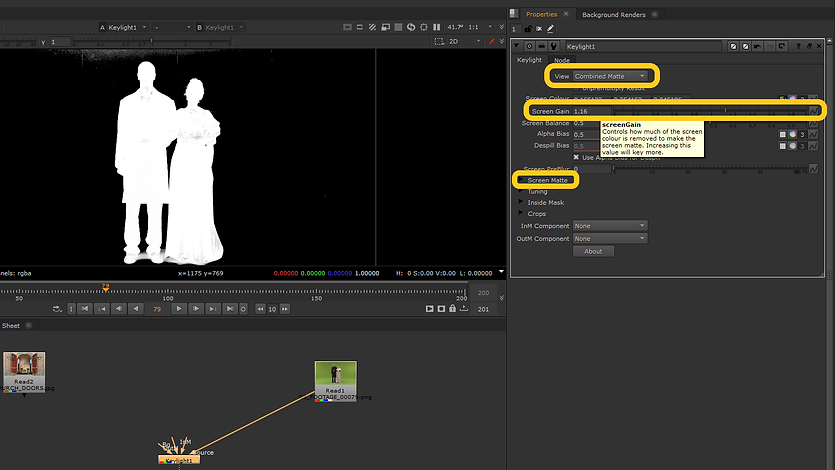.png)
Set view, Screen gain, and twirl down the Screen Matte menu to see the options of that.
.png)
Set Clip Black, Clip White and Screen Softness.
.png)
Added Roto node, which is like a mask in AE, connected it to OutM, set OutM Component to Inverted Alpha.
.png)
The result.
Green Screen task by After Effects
Final Render
.png)
Workflow
.png)
Brought in the assets and made a comp.
.png)
Added Keylight effect.
.png)
Important settings: View, Screen Gain, Clip Black, Clip White, Screen Softness.
.png)
Pay attention to the patchy and low quality of the image especially in the black area. Luckily, there is a workflow to fix it.
.png)
I duplicated the keyed image, put it on top. Deleted Keylight of the bottom one. Used TrackMatte.
.png)
The quality of the black part becomes much better by using the above-mentioned workflow.
.png)
Used Advanced Spill Suppressor for the bottom image (the raw file, not the keyed one)
.png)
I played around with Screen Shrink/Grow and set it to -0.5 to smooth out the edges. Also set Screen Softness.
.png)
The result.
Lecture 5: NUKE COMPOSITING 3D RENDERS
This week, we looked at basic techniques of compositing 3D renders in Nuke. We brought an animation from Maya into Nuke and tried to change different parts of that in Nuke without editing the 3D assets themselves. We broke the 3D asset with a handy workflow into its parts, namely Diffuse, Specular, SSS, Transmission, Coat, Depth and AO, and played around with these parts in Nuke.
Final Render
With sound:
Workflow
.png)
Vieiwing parts of a 3D render.
.png)
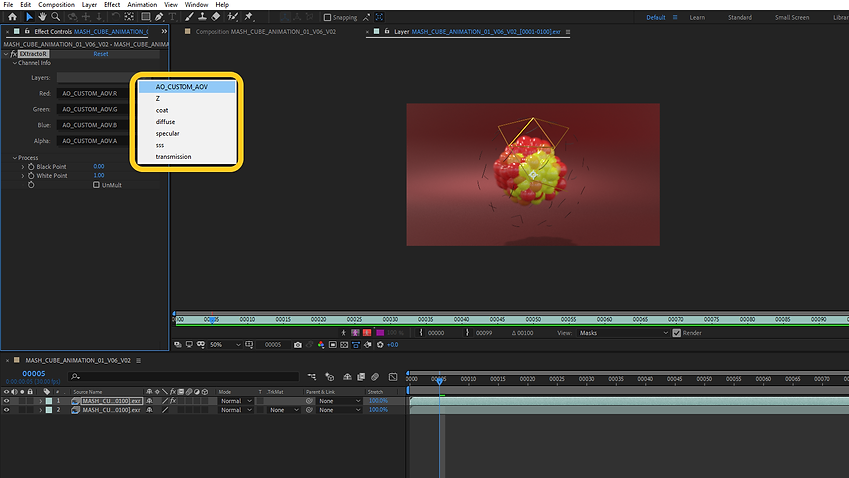
Maya AOVs settings. We can add or remove different render channels to export.
.png)
Added a custom AOV, to add the AO channel.
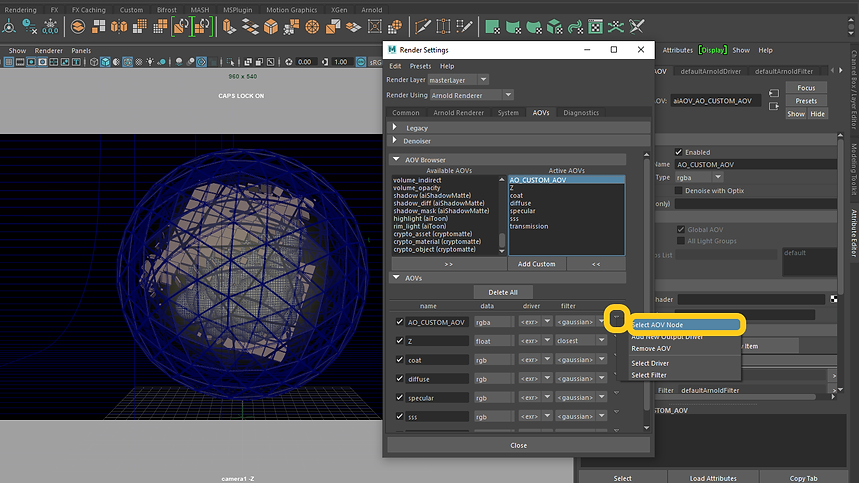.png)
To determine what kind of AOV we need.
.png)
Middle-mouse drag the aiAmbientOccusion to Shader under Custom AOV.
.png)
Important render settings. Go to Common tab of Arnold Render Settings.
.png)
Sampling settings. Also, I enabled Motion Blur.
.png)
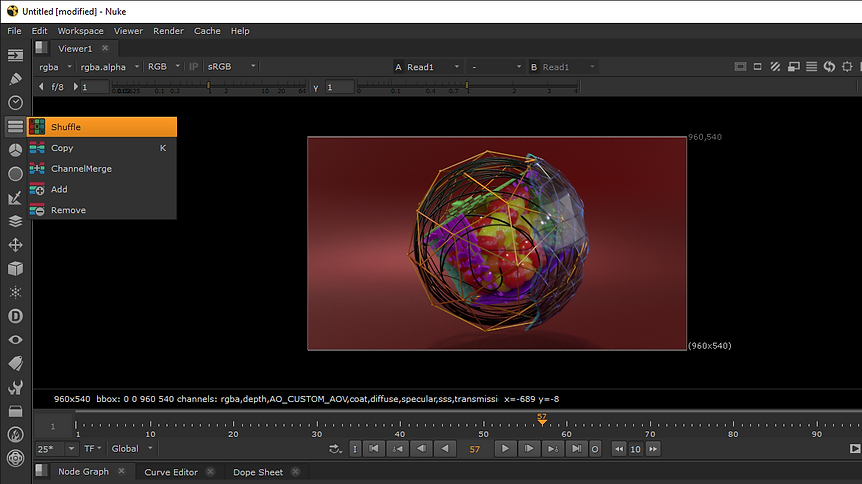
Back to Nuke, added Shuffle node to seperate different channels of the 3D render.
.png)
Setting up various shuffle nodes.
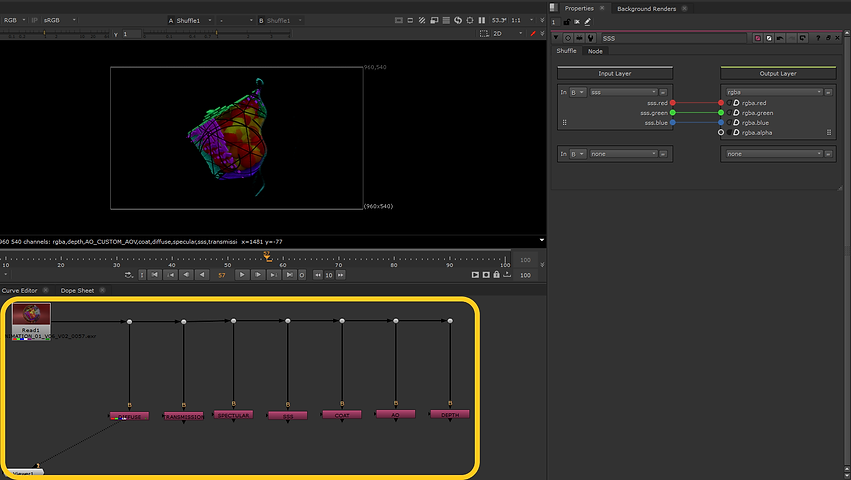.png)
Node graph when added different shuffle nodes and renamed them.
.png)
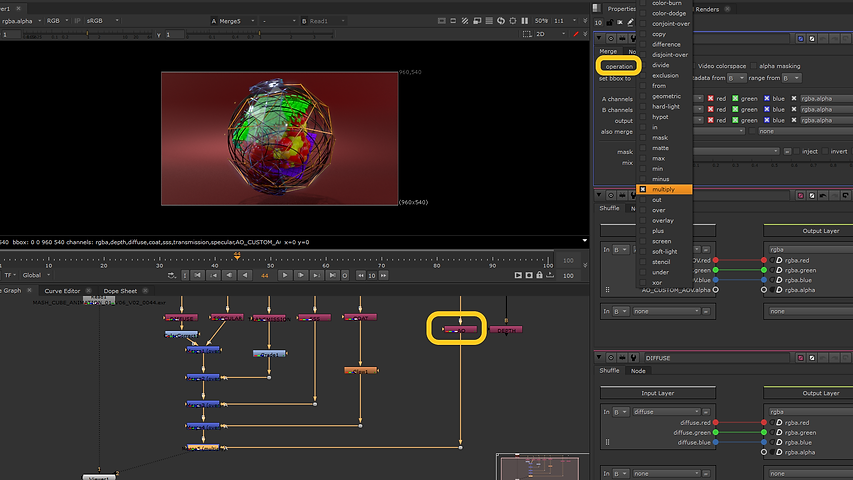
How to merge shuffle nodes to control each of them in an optimised way.
.png)
To colour grade the transmission channel, I played around with Blackpoint and Whitepoint handles after adding the Grade node.
.png)
Colour Correcting the diffuse channel.
.png)
Glow node, used for Coat channel.
.png)
Set the operation to "multiply" to have the AO channel working.
.png)
Depth shuffle node.
.png)
Used Grade node for Depth channel. Set black point to 32 and white point to 114, as these numbers are the distance of the camera from the nearest and the most distant parts of our 3D model.
.png)
Set the shuffle node for the ZDefocus node.
.png)
Set math to depth.
.png)
Set output to focal plane setup and then played around with the focal point in the viewport.
.png)
Played around with depth of field, size and maximum to make the model blurry and foggy.
.png)
Added a constant node.
.png)
Connected the grayscale mask made by depth channel + grade to the merge node. I used a blur node because the mask could make the model a bit jaggy, so I needed to blur the lines a bit.
COMPOSITNG 3D RENDER PASSES IN AFTER EFFECTS
I did almost the same 3D renders compositing this time in After Effects.
Final render
With sound:
Workflow
.png)
Note: change the working space to one that is suitable for our 3d assets.
.png)
Duplicated the layer several times.
.png)
Applied ExtractoR effect to each of them.
.png)
Assigned relevant passes to each layer
.png)
Layers: Diffuse, Specular, SSS, Transmission, Coat, AO, Depth. Order is important.
.png)
Used Add as the blending mode for all the layers (except for AO)
.png)
Needed to add an adjustment layer to rectify the exposure. After Effects stripped off the gamma exposure settings from the asset, so we needed to correct it at this stage.
.png)
Correcting the gamma settings by using the Exposure effect.
.png)
Correcting the gamma settings by using the Exposure effect.
.png)
Used Hue/Saturation on Transmission layer to colour grade the transmission pass.
.png)
Used Multiply mode for AO layer.
.png)
Set up the Black Point and White Point of ExtractoR.
.png)
Added an adjustment layer, named it Blur.
.png)
To blur the far away parts of the 3D render, used Camera Lens Blur and put it onto Blur adjustment layer
.png)
Under Camera Lens Blur, went to Blur Map options and set Depth layer. To be able to use the depth with its ExtractoR working, we need to Pre-Compose the depth layer.
.png)
Pre-composed the depth layer. Now we can correctly use it as a mask for the blur layer.
.png)
Pre-composing options.
.png)
Duplicated AO layer. Named it fog_matte and the plan is to change the background and make the 3d a bit foggy.
.png)
Changed it from AO to Z.
.png)
Changed the ExtractoR settings to make the 3d like a mask
.png)
Added a solid.
.png)
Changed the colour of the solid.
.png)
Put the solid layer under the fog_matte layer and set Track Matte to Luma Matte.
Lecture 6: INTRODUCTION TO ANIMATION IN MAYA
This week, we started to get hold of the basic concepts and techniques of animation in Maya. The concept is almost the same as other pieces of software, we create keyframes, and Maya would animate the model by generating and filling the frames between the keyframes.

THE MAZE TASK
As my first attempt to animate in Maya, I tried to animate a ball, moving it through a maze, and it took a lot of juggling and practice to accomplish this task.
RENDER WITH SOUND
Some useful tips and techniques:
Important to set up the frame rate before starting to animate.
.png)
Preferences -> Time slider -> Playback Speed. Set it to 25 fps x 1
.png)
Select a tangent and press the Break Tangents button on the top side of Graph Editor
.png)
Right-click on a tangent to change between Weighted Tangents and Non-weighted tangents
.png)
Use Stats in the Graph Editor toolbar to change the time and the value of each tangent.
.png)
Use Stats in the Graph Editor toolbar to change the time and the value of each tangent.
.png)
Curves -> Post Infinity options are useful, especially Cycle with Offset option. We can use this to repeat the animation.
.png)
To be able to see the effect of Post Infinity, check Infinity under the View menu.
.png)
Visualize menu has some useful tools for animation.
.png)
Visualize -> Create Editable Motion Trail
.png)
Visualize -> Create Thumbnail -> settings
.png)
Visualize -> Ghost Selected
.png)
Visualize -> Create Animation Snapshot -> settings
.png)
Animation snapshot created.
.png)
Visualize -> Create Animation Sweep
.png)
Windows -> Playblust -> settings
.png)
WEEK 8: INTRODUCTION TO MASH!
MASH is a Maya plugin helping us to create motion graphics and visual effects, and procedural models, without having to use external software. It is now included in the Maya software. To start with MASH, we need to make geometry and then we create a MASH network from that.
Some MASH techniques and workflows
Note: The pivot of the geometry that we want to create a MASH Network for should be in origin. If it is not, Mash does not work properly. We can simply either group the geometry or position the pivot in the 0,0,0. After positioning the pivot in origin, we need to freeze transformations.
.png)
The result when I placed the pivot in origin and created a MASH network from the geometry.
.png)
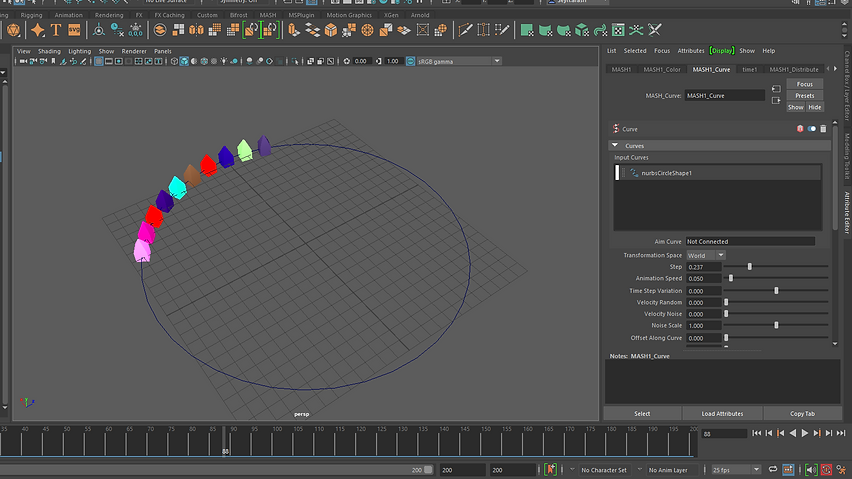
Distribution types under Distribute node. I used Linear and played around with its settings to create this twisted thing.
.png)
Radial type of distribution.
.png)
Spherical distribution type
.png)
I set the distribution type to Mesh, and connected a cone to it, then played around with different methods of Mesh distribution.
.png)
Method: Random Vertex
.png)
Used Voxel method. This method fills the Mesh with the geometry. Played around with Voxel Settings as well.
.png)
Method: edge. I ticked Enable Scaling to be able to scale the geometry and create this model.
.png)
Gride type of distribution
.png)
Distribution type: Volume. we can change the volume shape from sphere to cube or point.
.png)
One of the most interesting nodes we can add is Audio Node. It uses an audio file to change the geometry in line with the soundtrack. I also imported the audio file in Maya to be able to hear the music and see the geometry together.
.png)
Created a grid and then added a Random Node.
.png)
The result of using Random node. Started to get my head around Strength attributes and how they work.
.png)
For Strength Map, I used the logo of Facebook in black and white, as a jpg file downloaded from the internet.
.png)
Created a Map Helper to be able to use the helper as the strength map.
.png)
I can move the helper, and the geometry automatically gets affected.
.png)
Falloff Object is very handy when we want a MASH Node to affect only a specific part of an object, not its whole.
.png)
The shape of the Falloff Object can be changed. Inner Zone can manipulate the falloff. We also can use the Falloff ramp.
.png)
Created a torus and set the shape of Falloff Node to Mesh.
.png)
Connected the torus to the Falloff Node.
.png)
Here I created a grid to apply the Colour Node on that.
.png)
Played around with different settings of the colour node.
.png)
Added a Signal Node
.png)
Set Signal Type to Trigonometry and fiddled around with Trigonometry Settings to create this shape
.png)
Mode: Add. It creates a very nice effect.
.png)
Played around with Add Mode Fade
.png)
Here I animated the Random Strength attribute.
.png)
Then added a Spring Node to make the animation more interesting.
.png)
When we have multiple objects selected and create a MASH Network from them, we can use ID Node. I made a grid and then set ID type to Random to create this
.png)
Animating Random Strength of the Random Node
Animating Random Strength of the Random Node + Spring Node
WEEK 09 MORE MASH
This week we got introduced to further nodes and techniques of MASH in Maya.
.png)
Used Curves node.
.png)
To get the Curve node working properly, Distance x and y should be set to 0.
.png)
Used Orient and Signal nodes.
.png)
Set Orient Mode to Velocity.
.png)
For the Dynamics node, we need to set Playback Speed to Play every frame
.png)
Dynamics node
.png)
Mash Bias options.
.png)
Added a Signal node (4D Noise type)
.png)
To have the Trails node working, we need to set the Playback speed to Play every frame
.png)
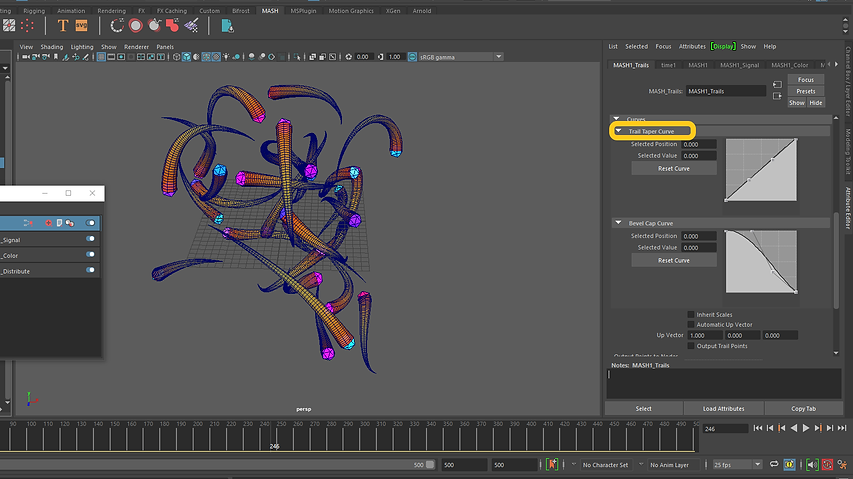
Taper settings.
.png)
To change the shape of trails as we want, we need to create curves and middle-mouse drag the curve to the Profile Curve box under the Trails node settings.
.png)
Trails Mode options and Curve Samples number are important.
.png)
Created Constraints
.png)
Constraint types
.png)
Note: To get the Constraints renderable, set Trails Mode to Constraint Pairs
.png)
Trails do not inherit colour from geometry. We need to assign material to the trails. We can use Ramp for their colour and transparency attributes.
.png)
Alembic Cashe -> Export Selection to Alembic
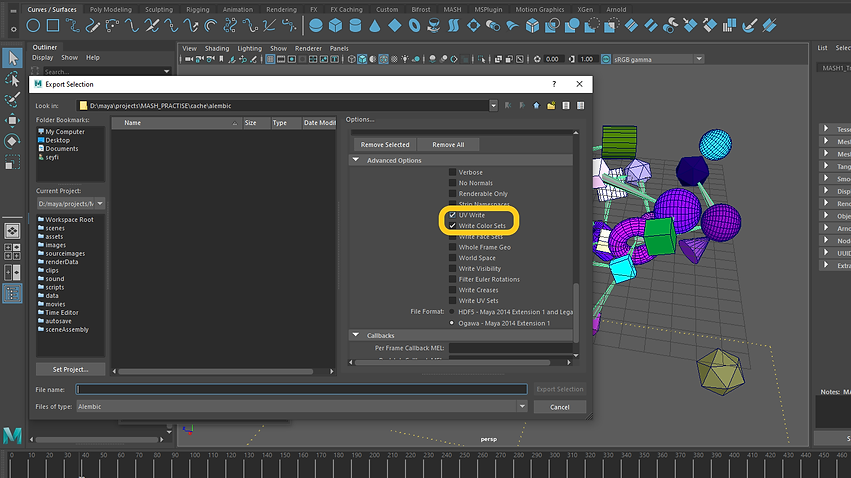.png)
Note: check UV Write and Write Colour Sets when exporting to Alem
.png)
Now we can import Alembic.
Rendering colour node with Arnold
.png)
The Colour node uses vertex colour, So Arnold needs to know that we have vertex colour in the scene
.png)
First, tick Export Vertex Colours under ReproMeshShape node.
.png)
Then apply an Arnold material to the mesh. Go to Mesh Display -> Color Set Editor, copy the name of the colour set.
.png)
Create aiUserDataColor node and connect it to the Base Colour of the material that we applied. Paste the colour set name in the Attribute box.
WEEK 10: MAYA LIGHTS, CAMERAS AND RENDERING
.png)
Overscan which is camera scale setting
.png)
Used various locators to animate the camera positon
.png)
Maya Lights
.png)
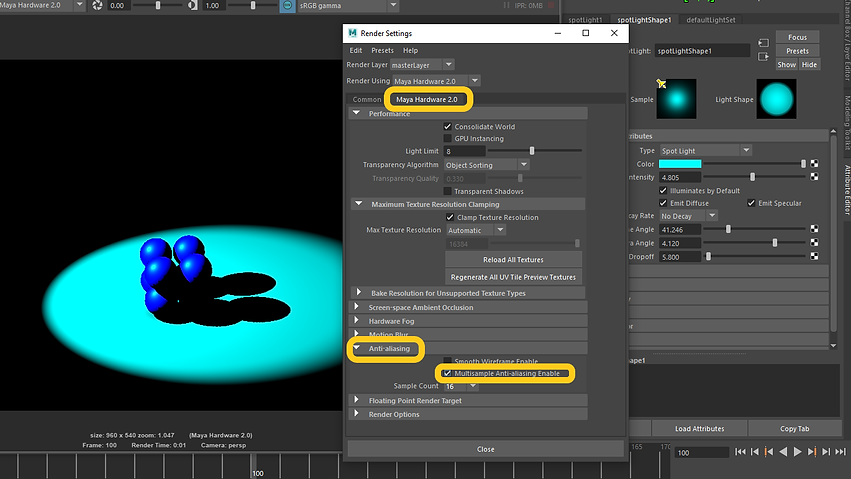
Maya Hardware 2.0 render settings
.png)
Common settings of Maya Hardware 2.0 renderer
Maya lights

WEEK 11 - 3D IN AFTER AFFECTS
This week, we looked at the 3D features of After Effects. It is important to understand that we will be manipulating 2D layers in 3D space in After Effects, so there will be no 3D objects with any extrusion. While we will call these layers “3D” in After Effects, they’re still flat images. Sometimes though, we call them 2.5D because we are manipulating 2D shapes in 3D space.
My first attempt at 3D in After Effects
WEEK12: MORE 3D IN AFTER AFFECTS
Continuing with the previous week, we got the hang of the Maya Live Link plugin for After Effects and some useful workflows. Maya Live Link plugin generates a live link between Maya and After Effects helping us view a scene in both software simultaneously, as well as making adjustments in Maya and having them updated in real-time in After Effects.
Compatible elements:
-
Cameras (including Transforms, Focal Length / Aperture, Zoom)
-
Spot, Point, and Ambient Lights (including Transforms, Intensity, Color, Cone)
-
Groups (converted to Nulls)
-
Locators (including Transforms)
-
Planes (to adjust size, scale a 1x1 plane. Do not use Width / Height).
-
Meshes (converted to Solids)
And the data that can be exported:
-
Position
-
Rotation
-
Scale
-
Intensity, Cone Angle, and Color (for lights)
To find more information about the plugin, click here.
Playing around with 3D in AE
Some techniques and tips
.png)
Headed to Modify -> Match Transformations to use this quick method for matching the translation attributes or pivots of my locator and the cube.
.png)
I moved the render layer 1 frame forward as Maya starts from frame 1 while AE starts from frame 0.
.png)
Added Repeater.
.png)
Parented the Star Comp to the locator.
.png)
Created a Solid and used Multiply blending mode.
.png)
To remove the shadows from the cube's surface, I did another render just for the cube in the Maya and brought it into AE, then I put it above the Solid layer and used Alpha Inverted Matte for the solid.
.png)
To make the shadows more realistic and appealing, I played around with Shadow Darkness and Diffusion.
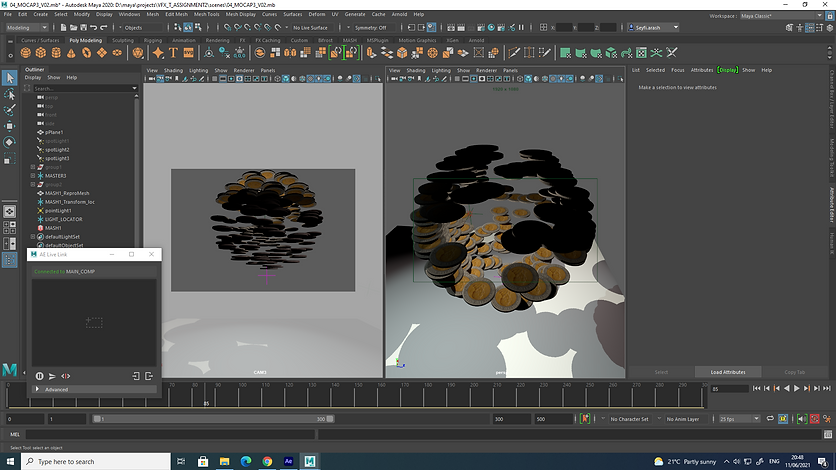
Week 13: Maya Content Browser Mocap
This week we got introduced to Maya Content Browser which can be accessed through Windows -> General Editors -> Content Browser. I used some mocap samples provided by the Maya content browser and took different renders of them into After Effects to make a composition.
WEEK 14 AFTER EFFECTS ADJUSTMENT LAYERS
We looked at adjustment layers in After Effects this week. Effects and adjustments on adjustment layers apply to all layers beneath them, so they are useful for applying effects and make changes to many layers at once.
Using the adjustment layers in After Effects, I changed the below image to make it more visually attractive and appealing. I used camera lens blur, exposure effect (for vignetting), curves effect (for colour grading), and different footage such as lens dirt and dust particles.
Before:

After:

Assignment 2: Title Sequence
For this assignment, I worked on a title sequence whose inspiration initially had come from Fight Club film title sequence, but after a while, it morphed into something different. Anyway, my major aim was to work on camera moves to create something like Fight Club opening title sequence in which the camera follows backwards, forward and moves alongside the subjects being recorded.
MY TITLE SEQUENCE - FINAL RENDER
Video with sound. Please listen with headphones for a better experience.
I first created some Mash animations and Mocap scenes in Maya; then, I rendered out different parts such as shadows, the characters alone, etc., and used Maya Live Link to export camera, lights, locators, and locators planes to Adobe After Effects. Then in AE, I applied various techniques and workflows such as green screen footage, masks, adjustment layers, track mattes, blending modes, motion graphics techniques, etc., to make the whole composition more visually attractive. Finally, I named my title sequence "Mad Money" and used coins as a recurring image/motif in the whole sequence.
.png)
.png)
.png)
.png)