Performance Animation
Week 01: Maya Quad Draw Tool
In the first session of this module, we learned a new tool in Maya: Quad Draw. Quad Draw Tool offers a simplified, one-tool approach for retopologising models. Wish Quad Draw tool, we can produce clean meshes while keeping the shape of our reference surface. This week, we used a photo of ours as a reference and tried to get our head around retopologising manually using Quad Draw.

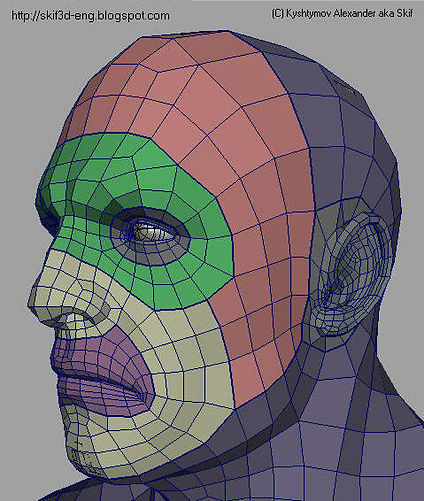
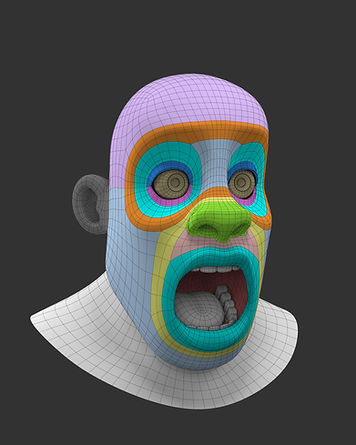

Using Quad Draw (steps)
1- Make a plane and bring in a reference image (using the PolyPlain method)
2- Make the reference mesh (plane) live so that the Quad Draw tool can snap to its surface
3- Open the Quad Draw Tool
4- Define vertices by dropping dots
5- Shift-click on a face preview to create a face
6- Continue to add faces by dropping additional dots, making new faces and extending existing edges
.png)
Set reference image and started dropping dots (vertices). To do that, I made the plane live then added it to a display layer (set to reference mode) so that I could not select it anymore.
Half of the face was created by Quad Draw tool. I also used Soft Selection (press B) to form the face.
.png)
Selected the middle line of the face and used scale to straighten it. I also set the pivot point correctly, so the pivot is located precisely on the y axes.
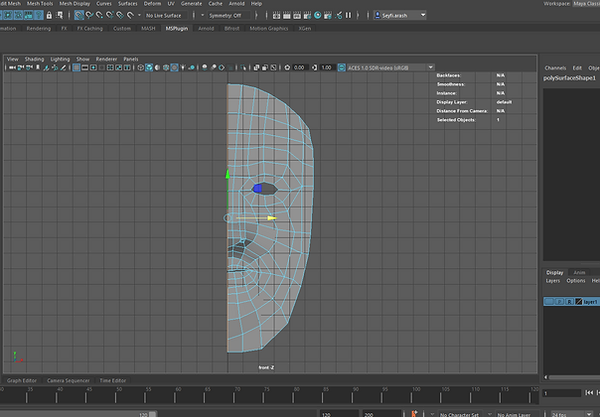.png)
Made a proxy for another half of the face.
.png)
Subdiv Proxy options should be set as this:
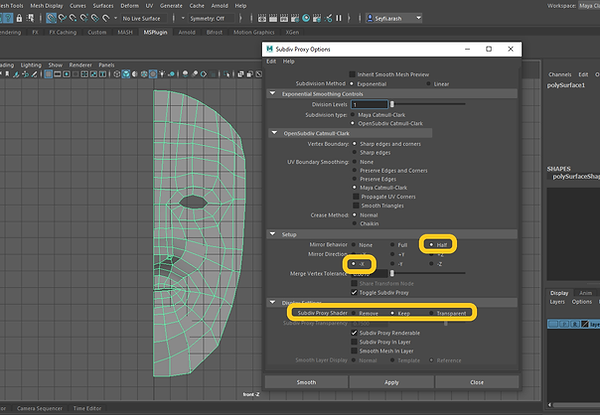.png)
.png)
I then could work on half of the face and pay attention to another half (smooth proxy) getting updated.
Quad Draw Tool hotkeys
Find some useful Quad Draw keyboard shortcuts here.
Quad Draw Youtube tutorials
Week 02: Retopologise ZBrush
This week, we looked at how to make topologies in Zbrush with ZModeller. Using ZModeller, we attempted to reconstruct the face topology using the DemoAnimeHead as a template.

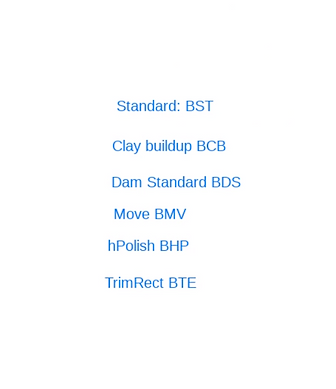
These are a few hotkeys for the most important brushes in Zbrush.
.png)
.png)
I used DemoAnimeHead as my starting point. I then used a Topology brush to draw lines and have something to start with.
.png)
While using the ZModeler brush, hover on an edge, vertex or face and press shift to see the menu. Activate Snap to Surface, and extrude for extruding the edges by dragging them.

Continue to create faces by extruding the edges.

Final result.
Edge Extrude Retopology in ZBrush (Youtube tutorial)
Tips:
-
Start with a Topology brush to have a bit of geometry on top of the face
-
Take your brush size down to 1 and click on your model
-
Go to Subtool -> Split -> Split to Similar Parts
-
Turn on Transparency, turn off Ghost, turn on PolyFrame
-
Choose ZModeller brush
-
Extrude edges and draw face topology - edges behaviour: Extrude and Snap to Surface, points behaviour: Move and Snap to Surface, face behaviour: Do nothing
-
Check the loops by changing the behaviour of edge hovering to Insert Edge Loop
-
Press Ctrl + W to cycle through the colours to change the colour of polygons
-
Go to Geometry -> Creases -> UnCrease All to get rid of the creases
-
To have a quick smoothed preview go to Subtool -> Dynamic Subdiv -> Dynamic
-
When it's done, you need to do the projection
-
For projection, first have a few subdivisions. Then go down to Subtool -> Project -> Project All
Week 03: Hard Surface Modelling - ZBrush
This week, we first worked again with Quad Draw in Maya and tried to model some parts of a robot topology. We used the Human Body character as a base for our topology. You can find this character in the Maya content browser -> Modelling -> Bipeds -> HumanBody.ma.
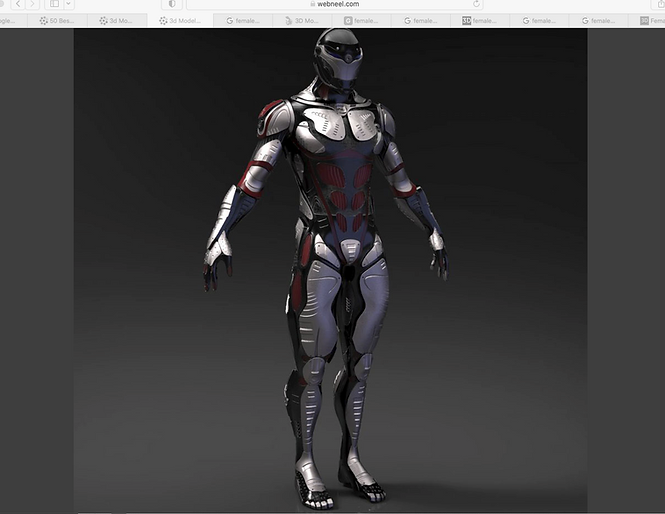.png)
I searched for a mech character and chose the above image as my reference.
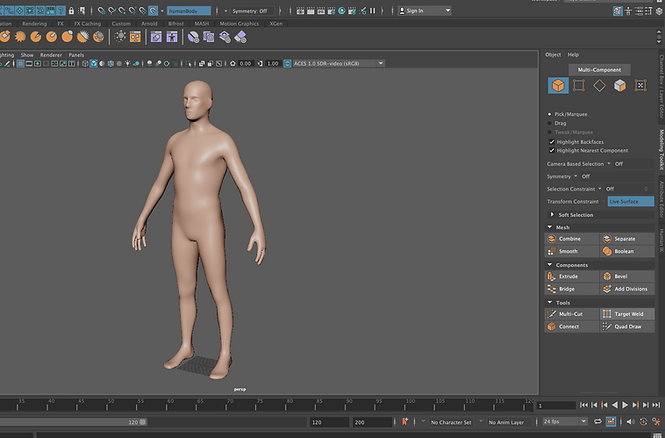
Opened HumanBody.ma from Maya content browser.

Started to make a topology with the Quad Draw tool.

By using the Multi-Cut tool, I tried to modify the topology to have loops.
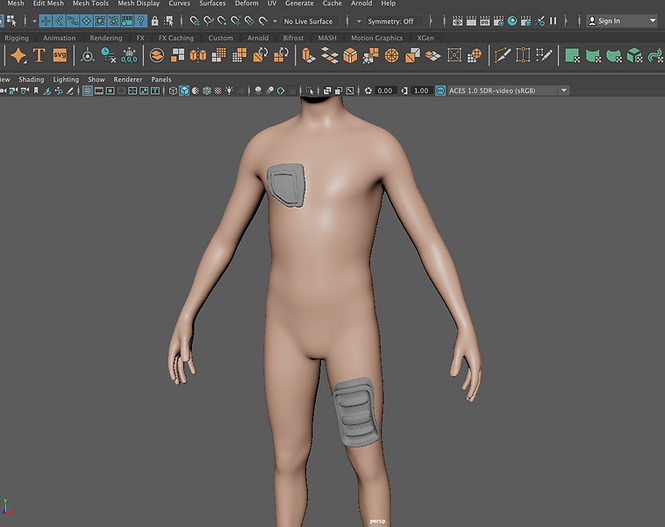
Simple shapes made with Quad Draw, Multi cut and extrusion.

Deleted a few rows of the faces, inserted some cylinders and extruded the skin.
Mesh Project Brush - hard surface modelling in ZBrush
We spent the second half of the session working with Mesh Project in ZBrush. Mesh project is added to ZBrush recently and is a very powerful and unique method of hard surface modelling. For the purpose of learning this technique, we used the Male project under LightBox.
Tips
-
Reduce Z Intensity if you want to have a nicer result using MeshProject brush
-
Turn on Live Boolean
-
Press Shift while drawing with MeshProject first and when releasing the mouse. This helps weld and add the mesh together instead of having them overlapping each other.
-
Press Alt while drawing with MeshProject to cut off the mesh
-
We can add an alpha / hard surface alpha (choose from the lightbox -> Alpha) to our brush for either our additive or subtractive subtools
Practising MeshProject
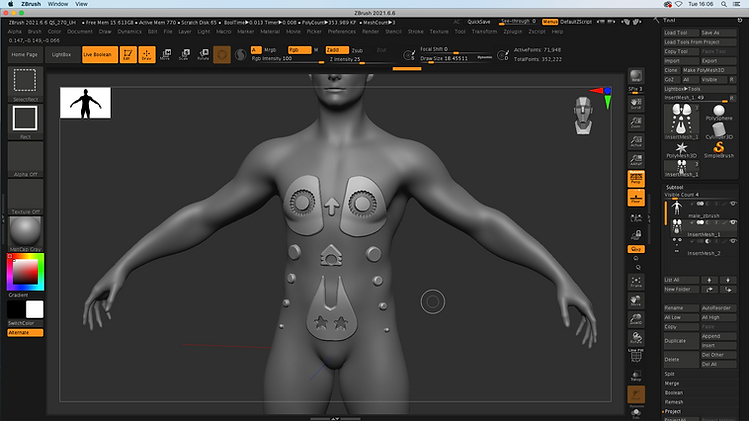

ZBrush 2021.6 - Mesh Project Brush (Youtube tutorial)
ZBrush ZModeler Basics (Youtube tutorial)
Mech Modelling: ZBrush Hard Surface (Youtube tutorial)
ZBrush: Clip Curve
-
Press B C C to get the Clip Curve brush. Hold down Ctrtl + Shift to use the brush.
-
The Clip Curve pushes the polygons with a curve. This is a straight line by default.
-
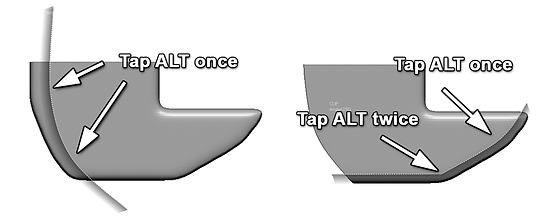
To make an invisible point that will turn the line into a curve, tap the ALT key.
-
By default, the Clip Curve draws a straight line across all of the polygons, bringing them all into the same plane.
-
Double-tap the ALT key to make an angle at the point position instead of a curve.
-
If necessary, use the space bar to move your curve as it is being created.
-
If you want to push the polygons to the opposite side of the curve according to the curve shadow location, use the ALT key while releasing the cursor.
ZBrush: Trim Curve
-
Press B T M to turn the brush on.
-
Trim Curve brushes (Trim Curve, Trim Lasso, Trim Rectangle, and Trim Circle) remove the section of the model that is on the darkened side of the curve. Note: instead of just pushing polygons toward the curve, Trim Curve brushes completely erase them.
-
To open the pop-up selection, press Ctrl+Shift and click the Brush thumbnail to access the Trim Curves brush. Trim Curves will always be engaged when holding Ctrl+Shift until a new brush type is selected using the same method.
-
These brushes only function on models that don't have subdivision levels.
-
Symmetry does not work with the Trim Curve!
-
Tap Alt to make a curve shape, double-tap Alt to make a sharp edge
-
Press Ctrl + Shift to select BRadius. It will cut off the size of brush along the drawn curve/line. Note: do not release Alt before releasing the mouse, otherwise the result would be the opposite: it will cut off the whole mesh and keep the curve in the size of the brush.
-
To separate the cut mesh out, go to Subtool -> Split -> Split into Parts.
ZBrush: Slice Curve
-
Press B S I to turn the brush on.
-
Turn on PolyFrame to be able to see what happens when using Slice Curve
-
If you have two or more playgroups, you need to unify them to begin with. Go to Polygroups -> Auto Groups
-
To get it working, use Dynamesh, set the resolution a bit higher and press Groups as well.
-
Slice Curve creates polygroups.
-
You can smooth out the polygroup made by Slice Curve
-
Again, use Alt to make a curve, space to move the curve, double-tap Alt to make an edge
Week 04: HumanIK in Maya
We looked at the Maya rigging system (HumanIK rig) this week. We also were introduced to painting weights in Maya. We spent most of the session learning how to define a character and then apply Motion Capture data to its rig.

I brought in the skeleton mesh by going to File -> Import
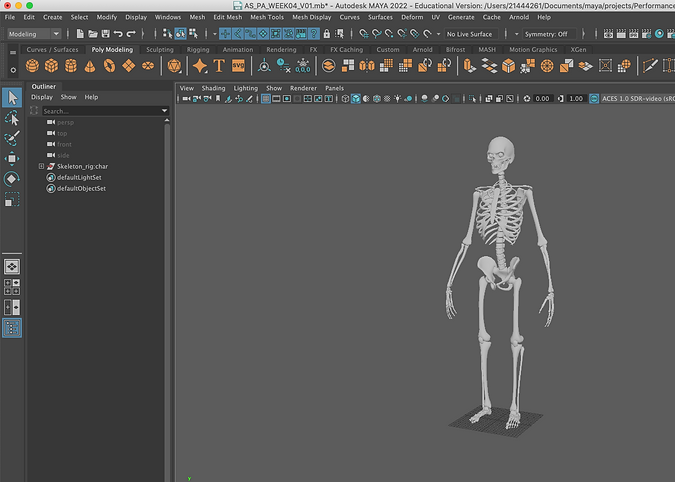
The skeleton imported.

Opened up Quick Rig. Skeleton -> Quick Rig. Clicked on + and selected Step-By-Step.
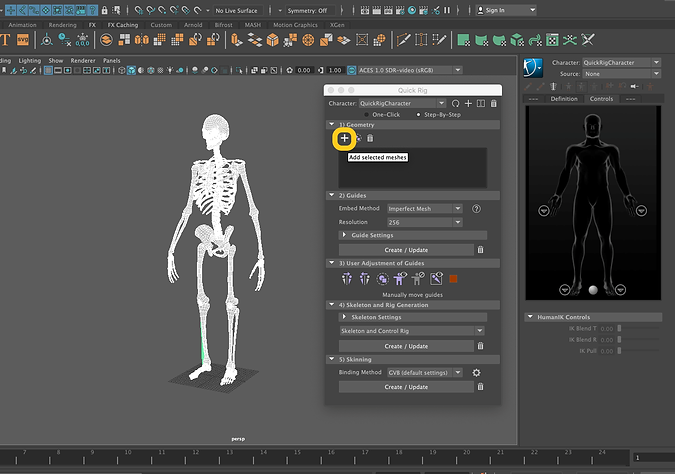
Selected the entire mesh and clicked on + to add them to the tool.

Chose Polygon Soup for the Embed Method.

Hit the Create/Update button to make the joints.
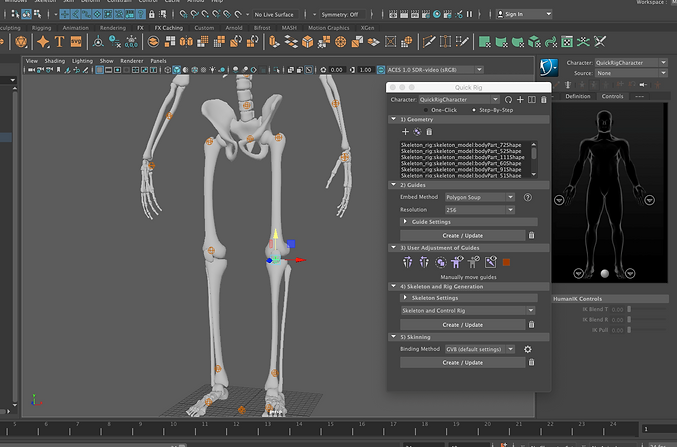
I carefully looked at the position of the joints and moved some of them. Note: try not to move the legs joints in X-axis.

I did not need to correct the position of all the joints, as I could do it for one side using the Mirror option.
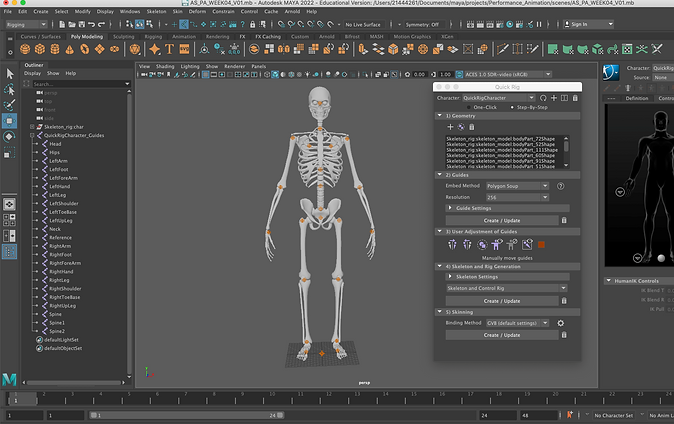
Mirror done.
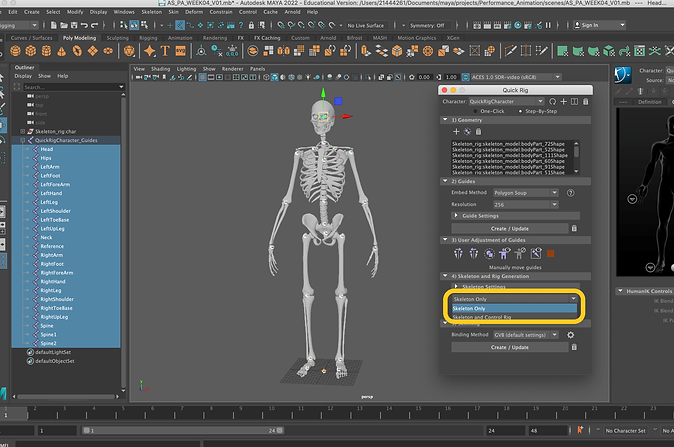
As we had mocap data, I chose Skeleton Only.

Rig generated.
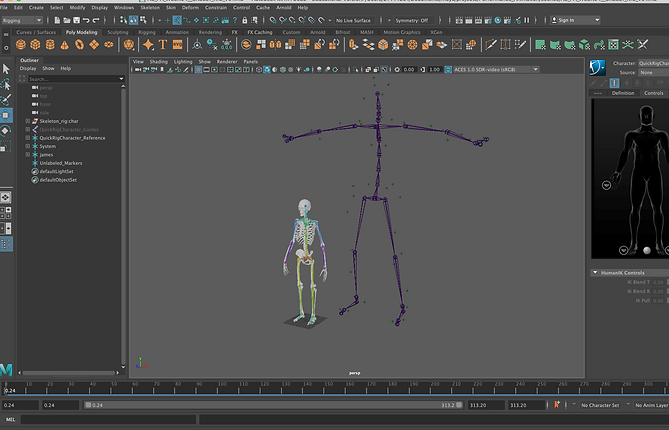
I then brought in the mocap data by importing it.

Deleted the unwanted mocap data.
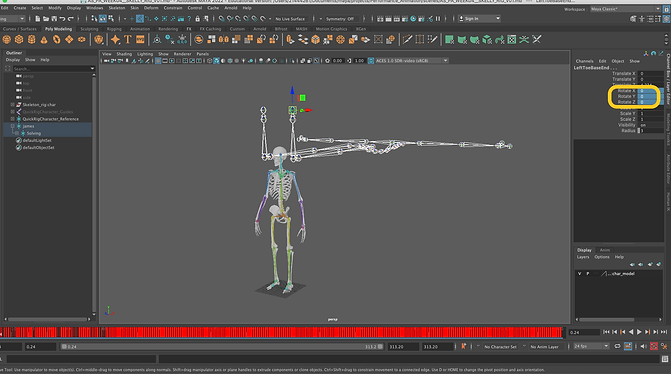
Important: Select the root, go to Select -> Hierarchy and then zero out the rotation. Then you need to rotate X 90 degrees.

Selected the root and rotated it in 90 degrees.

Result so far.

I renamed the skeleton from QuickRigCharacter to Skeleton.

Selected None for the Character. I then clicked on Create Character Definition.

For each joint, first, I selected them, then right-clicked on the corresponding bone and chose Assign Selected Bone.

Renamed it to "MC" which means Motion Capture data.
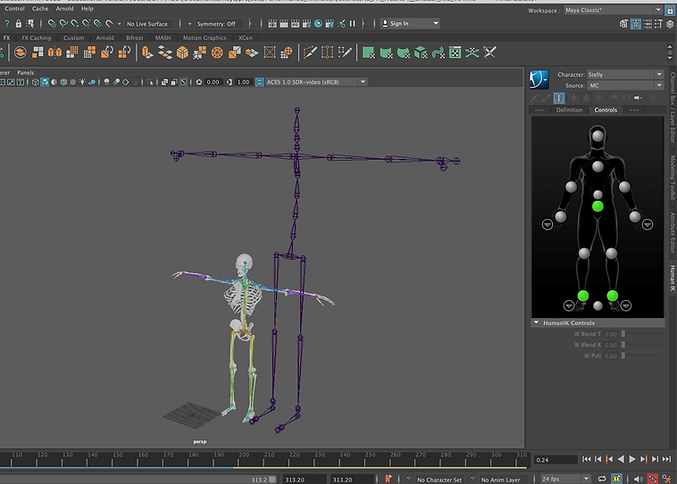
Selected my skeleton as the character and MC as the source.

Now the motion capture data is applied to my skeleton.
Playplast
Week 05 - Substance Painter Workshop

We practised a few texturing techniques and workflows in Substance Painter this week. Substance Painter's primary function is to texture models. Its powerful masking and procedural texturing features enable us to create textures that are far more difficult to achieve in other 2D applications such as Photoshop. Substance Painter was first developed and launched in 2014 by Allegorithmic, a French software company. Adobe bought Allegorithmic in January 2019.
I have already explored Substance Painter. Click here to learn more.
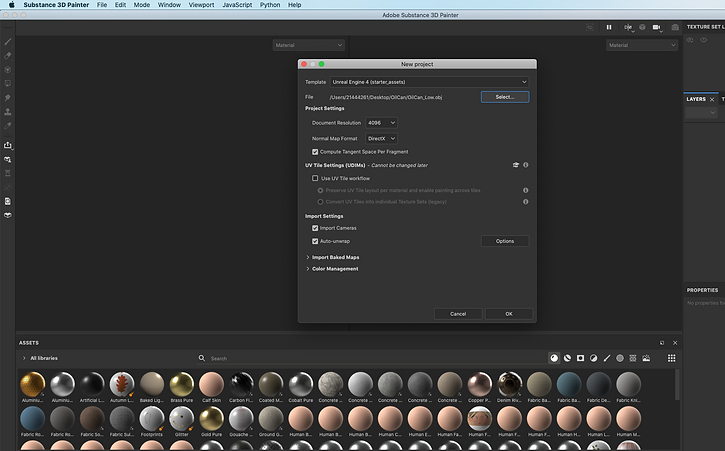
Made a new project and set it as above.
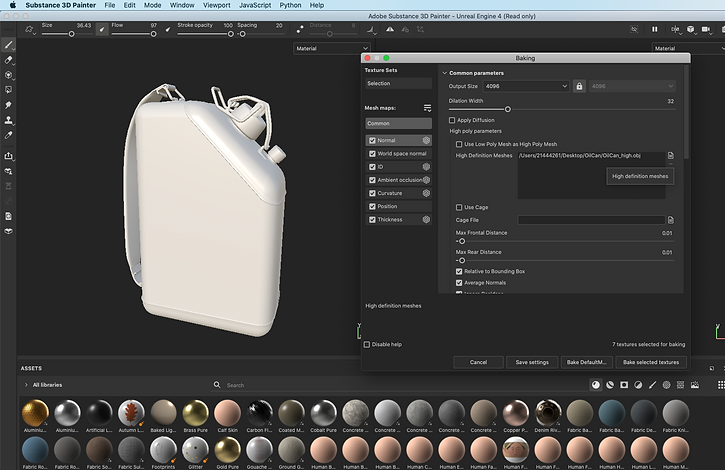
I baked it. Note: we can introduce the high poly meshes to SP when baking.
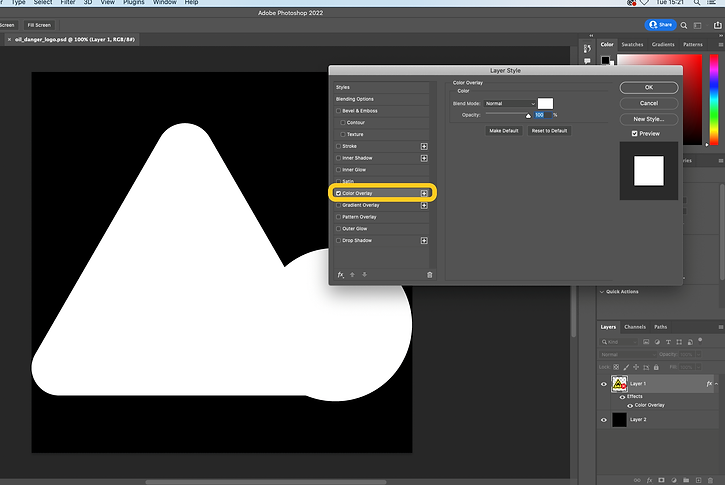
Used photoshop to create an Alpha from a logo downloaded from the internet.

Back in SP, I imported the logo file as well as the alpha made in Photoshop. Set them to texture and alpha.
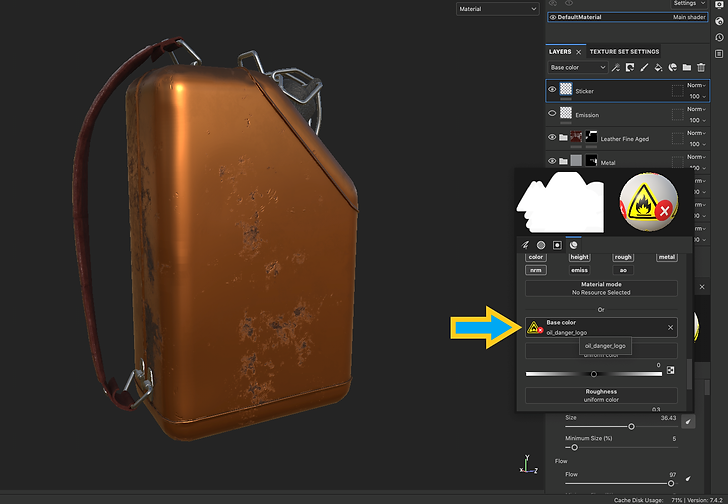
Made a paint layer, set the base colour to the logo file which was already imported to SP.

Set the alpha as well.
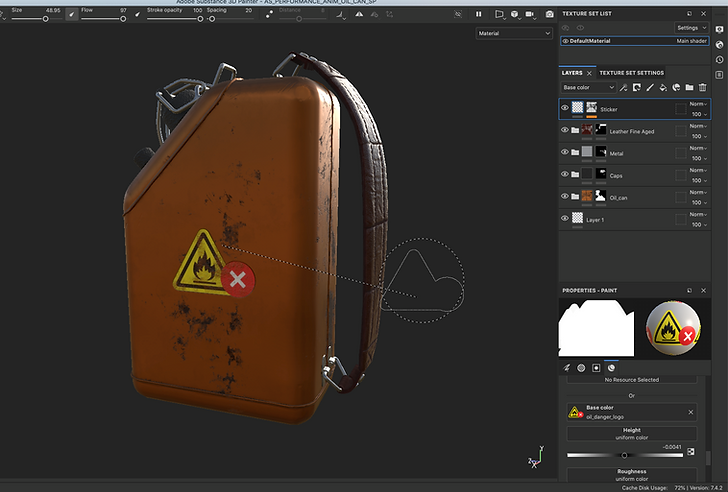
Logo painted.

Made a layer and added a filter.
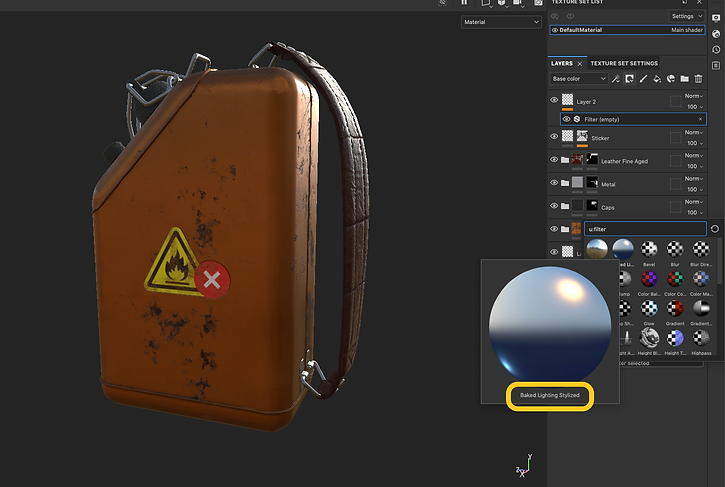
Baked Lighting Stylised filter selected.
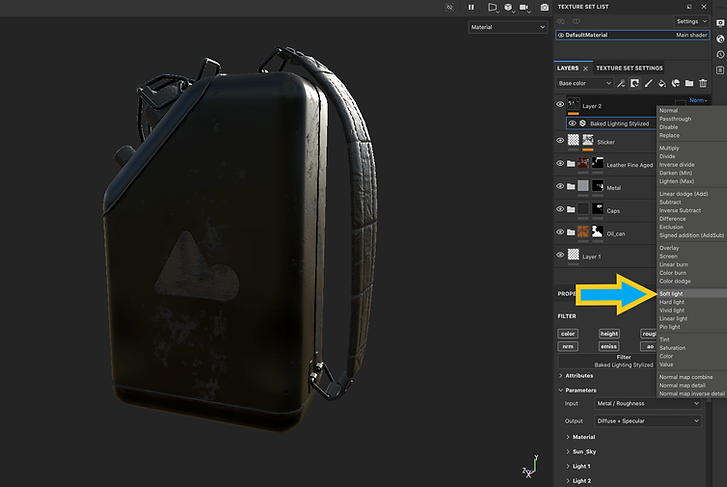
To fix the issue of the model being black, change the blending mode to Soft Light.
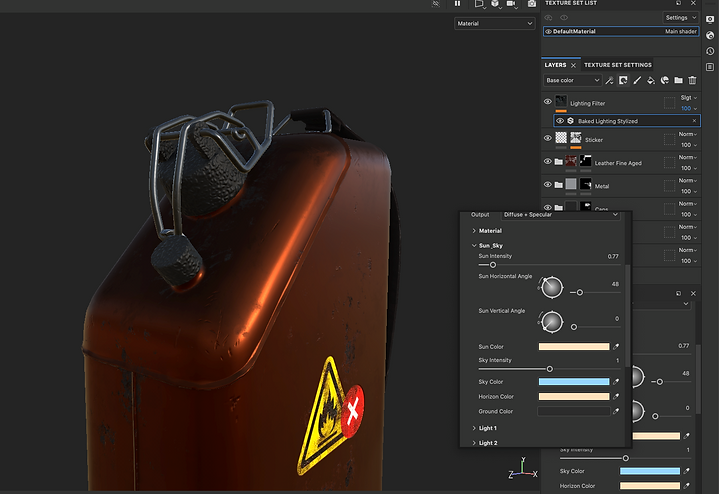
Changed Sun_Sky parameters (light sun angles) to fix/manipulate the lighting.
Result (Iray Render)

Week 06: ZBrush to Maya Pipeline
This week we looked at a helpful workflow to take our models from ZBrush into Maya. I have already fully explored the ZBrush to Maya pipeline in detail; click here to read more.
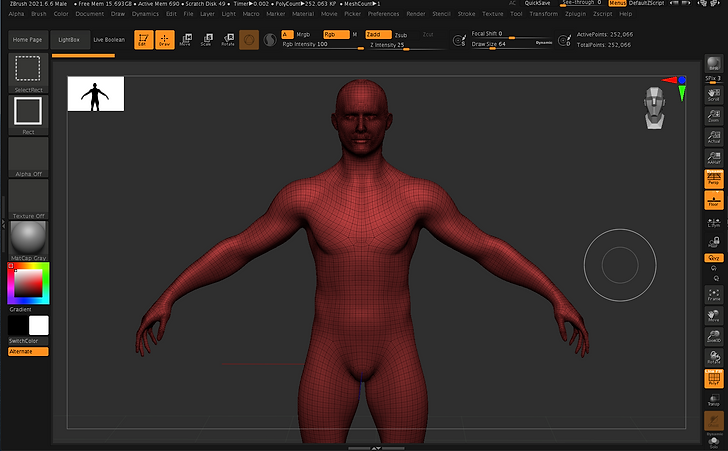
I started with working on a male demo character in ZBrush.

Used different alphas and strokes.

Used UV Master. UV Master is a plugin within ZBrush that creates very efficient UVs for our models. First clicked Work On Clone to make a low poly clone.

I then clicked on the Unwrap button for unwrapping my clone.

My clone laid out flat.

Under Texture Map, the options to create UVs are now activated, which means I have my UVs ready.

My model was imported to Maya. Created RaySwitch Shader for Environment to change the render background colour from black to white.
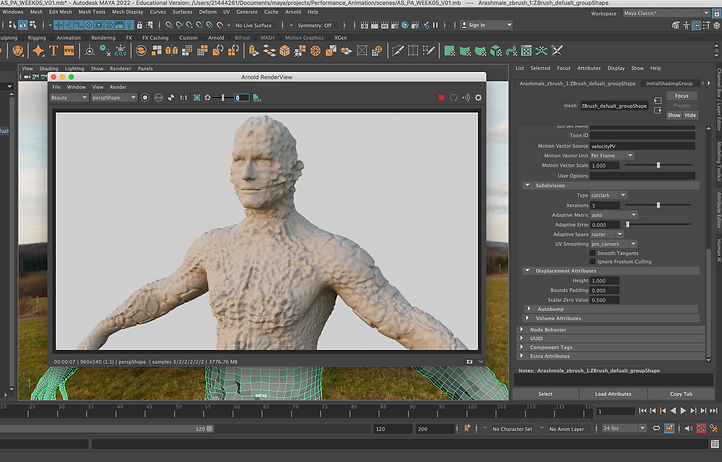
Subdividing while rendering with Arnold. Result.
Assignment 1: Motion Capture Preparation
I developed a mech character for the first assignment. My character will work nicely with motion capture. I modelled the character in Maya using Quad Draw and a variety of modelling techniques, then prepped it for texturing (UV unwrapping) before bringing it into Substance Painter. After painting my mech in Substance Painter, I used Maya to apply the texture maps to my character and create a good rig for it. Finally, I posed my mech in six different dynamic poses.
Dynamic Poses (rendered with Arnold)
Pose #1

Pose #2

Pose #3

Pose #4

Pose #5

Pose #6

Development of my mech character (video)
Video with sound.
Screen recording
Week 07: One to one Tutorials
There was no lecture this week.
Week 08: Substance Painter (photo-realistic texturing)
This week, we had another look at Substance Painter. We mainly focused on photo-realistic texturing techniques and using anchor points in SP. Anchor Points allow us to expose any resource or element in the layer stack and reference it in different parts of our project.
Using anchor points for my monkey (Screen recording)
Anchor Points with masked fill layer (Youtube tutorial)
Normal Maps and Anchor Points (Youtube tutorial)
Week 09: Megascans Bridge
This week, we had another look at Megascans Bridge. Megascans is a vast online scan collection of high-resolution, PBR-calibrated surfaces, vegetation, and 3D scans. Quixel Bridge is a desktop application that allows us to manage, blend, and export our downloaded scan data. We can use Bridge to develop a nice and realistic environment for our mech character.
Intro to Quixel Bridge
I have already explored Quixel Bridge and Mixer. Click here to read more.
A photorealistic environment for my Mech (Arnold render) - 1st attempt


Week 10: Quixel Mixer
We looked at Quixel Mixer this week. Mixer is a texturing programme that enables us to generate and blend different Physically Based Rendering (PBR) materials.
Intro to Quixel Mixer
I had a look at Quixel Mixer and explored its capabilities before. Click here to learn more.
Introduction to Quixel Mixer (Youtube tutorial)
Assignment 02: Motion Capture Scene
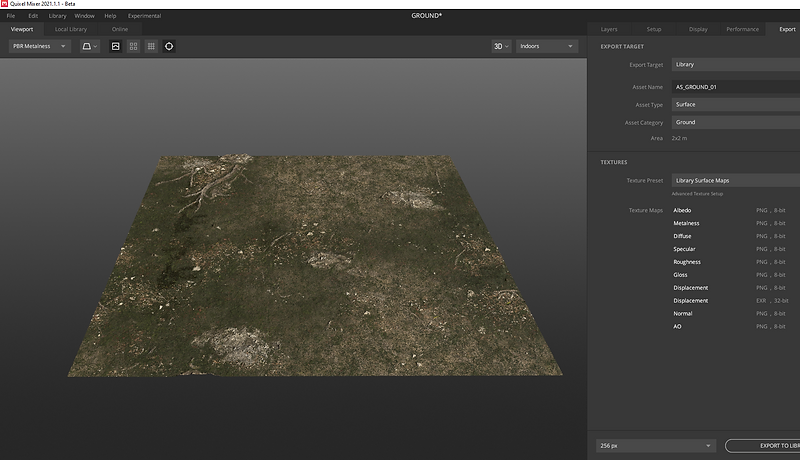
For the second assignment, I used motion capture data from the mocap sessions for one of my characters and used another mocap data for the other. I had to manually edit and clean up the mocap for several frame ranges. In addition, I put the characters in a setting to tell a specific story, attempting to be as creative as possible. I used several Megascans Bridge assets, animated the camera, played around with different light sources, added atmospheric volume to have the lights scatter across the scene, and hand-animated one of my characters to make the shooting action. Additionally, I used Quixel Mixer to create my own mix for the ground plane.
.png)
Blended various layers in Quixel Mixer to make my own mix.
.png)
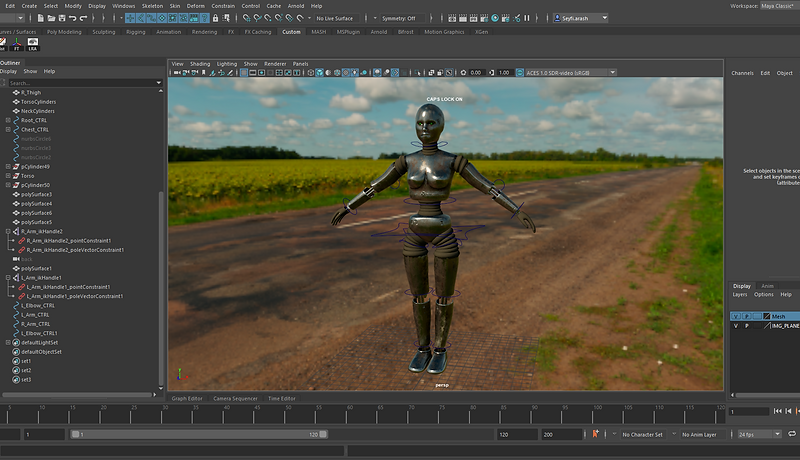
My mech character.
.png)
Rendered by Arnold.
Rendered sequence (Arnold)
Video with sound.