The Composite
Week 1: Intro to Nuke
In the first week, we got the hang of the Nuke user interface and a few basic concepts of that powerful piece of software. Nuke might seem a bit scary when you open the software for the first time, but after working with it for a while, you will find it easier to use, in my opinion. All the same, the programme is a node-based digital compositing and visual effects tool that is extensively used in post-production for television and cinema. This module, The Composite, is all about compositing utilising Nuke software.

User interface
Below I named each section of the Nuke user interface.

Some tips

It's important to set up the project directory before everything else. With the cursor on the properties bin, press S to open up project settings.

After setting up the project directory, go to File -> Insert Comp Nodes to import a script, then go to File -> Run Script or Open Comp.

The merge node combines different footage and BG/FG elements.
Excersie
We were given an exercise during the first lecture and were asked to use merge nodes to create an image by blending some small pictures.


Week 2: Organisation and Roto
This week, we looked at an example of a folder structure within industry and tried to figure out the logic behind its organisation. Then we learned the fundamentals of rotoscoping in Nuke, utilising different nodes such as Roto, Blur, Copy, Grade, Premult, Reformat, etc.
Importing footage/photo by Read node, we can see the resolution of that on the right-hand corners of the viewer. Then we need to go to Project Settings (hitting S when the cursor is on Properties Panel) and change the Full size Format to the correct one corresponding to the footage/image.

.png)
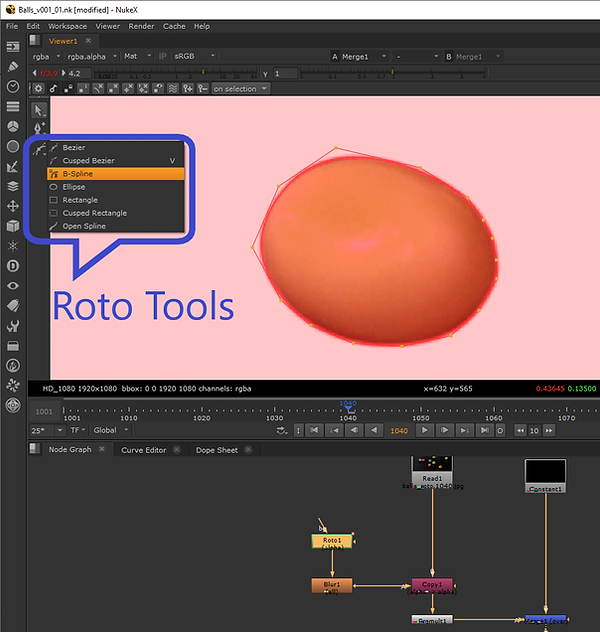
Adding Roto node (hitting O on the keyboard), we can make use of different roto tools (left-hand side of the viewer)
.png)
Press M to activate mask Overlay. Press Q to show/hide the control points of the mask.

I made use of the Blur node to blur up the edges of the mask. Copy node is essential when masking out, as we can add an alpha channel to our image by that. What the Copy node does is basically replacing channels in the B input with channels from the A input.

Added Premult node. By premult, we cut out the roto mask. The simple definition of premult is to multiply the alpha and the RGB of the input together.

Used Merge and Constant to change the background.
Note: To swap the input pipes of the Merge node, press Shift and X

To animate a roto across time, we can simply move the roto control points and Nuke sets different keyframes for us.
Note: Ctrl (Command) + <> : Go to the middle of two keyframes
Alt + <> : Go to the previous/next keyframes
I used the Grade node and connected the roto to it as a mask in order to change the colour of the roto without changing the colour of the whole image.


I just changed Multiply in the Grade node. Press Ctrl (Command) and click on the colour wheel of multiply to open a colour picker window.

Used Merge node and Constant to change the colour of the background.

Node graph. Note: press D to enable/disable a node and see its effect.
.png)
Note: we can press Ctrl and double click on a node to open up its settings (Properties) without leaving the Node Graph view.
Video
Week 3: Complex Roto
This week, we learnt more techniques and workflows of roto in Nuke. We went through some advanced exercises in the class to come to grips with complex roto techniques used in the industry. Breaking down a picture into Roto shapes, organising those shapes by creating folders and naming them, and animating rotos were some of the key things we explored during the session.

Roto'ing out a hand

I broke down the thumb finger into different shapes for ease of roto'ing, used Bezier and BSpline.
Made use of Roto and Copy nodes.


Then I animated the shapes across time by setting up keyframes (starting from the "hero" frame)

Feathered up the roto for making the edges soft.
Shapes organisation is so essential, especially when too many shapes! Simply click on "+" to create a folder and then name the folders. Note: change the colour of each shape to make them distinguishable. Also, we can turn motion blur on for roto'ing when having motion blur in our scene.

.png)
All roto shapes.
.png)
Made Constant node and merged it with the Premult.
.png)
Used Transform to scale up and move the hand. I also used the Blur node to blur up the edges of the hand (not in the above picture).
Video: A hand!
Week 4: Basic Keying
We explored a few basic keying techniques and workflows this week. Also, we were introduced to the concept of Garbage Mattes, Luma key and Chroma key, then practised some pertinent workflows in Nuke software.

Luma Key practice
.png)
Imported the image by Read node, then added Keyer node to work with luminance keying. In Keyer properties, played around with the handles of "range".
.png)
Added Roto and merge node to create a garbage matte. Note: use "matte" mode for the merge node.
.png)
This time, I used "stencil" mode as I wanted to cut out the roto'ed part.

This is the node graph and the image I made.
I improved my keying result by utilising a few more nodes and techniques. First I copied and pasted the code of Colour Dilation to create the node of that, then, I added the LightWrap node, and used "plus" for its relevant merge node.


In properties, tick "Generate wrap only", and play around with Diffuse and Intensity values.

Final node graph.
Chroma Key practice (greenscreen)

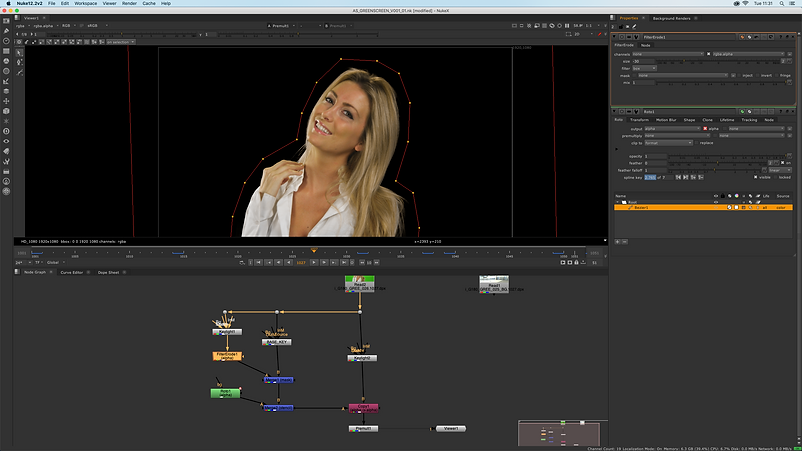
Added Keylight node for keying greenscreen. Simply Ctrl+Shift+drag to pick up the colour of the greenscreen. Note: to hide the colour picker, Ctrl+Shif+Lclick on the image.

Added another Keylight and selected "mask" for the merge.

Garbage matte, using "stencil" for the merge node. Also, used Erode (filter) node.
.png)
A very useful technique to fix the green bleed: Use Keylight and set the green value of "Screen Colour" to 1. Perfect technique indeed.

Final node graph.

Greenscreen output
Week 5: Advanced Keying
We carried on exploring more techniques and workflows in keying this week. We first got back to last week script and used Additive Key to help the image have more edge details. Then, we worked on an advanced greenscreen shot to practise more keying techniques.
Additive Keyer


Advanced keying
This is the shot I worked on.


You can see the effect of the Denoise node when looking at the blue channel.

Keylight node added, then picked the right-screen green colour.

Another Keylight added, this time for picking the left-screen green.
Used Keymix, instead of a Merge node, and connected a Roto to that as a mask. Basically, the Keymix combines two images with the use of a Roto as a mask so that it copies input A to input B where the mask is not black.

I made different Keylight, Keymix and Roto nodes to clean up the edge of the image. Then, I used a few garbage mattes connected to Merge (stencil) nodes.
.png)
.png)
Final image

Week 6: Tracking in Nuke
We explored different tracking techniques in Nuke this week, namely one-point tracking, two-point tracking and planar tracking. Below are screen captures by me showing the relevant workflows and methods.
One-point tracking
Two-point tracking
Planar tracking
Planar tracking steps
 |  |
|---|---|
 |  |
WEEK 7 - JOSH PARKS MASTERCLASS
Supplied assets:


Final result
Node graph (important parts)

Screen capture (video)
Colour grading


Final result

Node graph (for one of the monstors)
.png)
Week 8: Colour and Grading
This week, we dived deeper into the concept of colour correction and grading within Nuke. We looked at a few workflows such as matching elements to the plate, compensating for poor lighting, etc. However, our primary concern is to match components to the scene and to accomplish that, we often follow these steps: Match Luma (lightness) then match Tones.
Exercise 1
.png)
.png)
Result


After
Before
Exercise 2
.png)
.png)
Result
Before
After
Exercise 3


After
Before
Node graph
.png)
ColorLookup Node (Youtube tutorial)
Week 9: Cleanup and Patch repair (Grain & Noise)
We looked at grain and noise artefacts and learnt how to match different shots and scenes so that they blend together smoothly. Our job as compositors is to blend various bits of a film to make them appear to be shot at the same time and location. Also, in the first part of the session, we explored the RotoPaint node and tried to animate various patches with Tracker node information.
RotoPaint
When painting, we can:
• Shift+drag on the Viewer to change brush size.
• Clone tool: Ctrl/Cmd+click and drag to set the clone sample. To reset the clone offset, Ctrl/Cmd+Shift+click and drag.
Need more information about the RotoPaint node in Nuke? click here.
It's important to set the lifetime of our Clone patches to "all frames", so we can use tracker information to animate patches in the whole scene.

Reveal Tool
We may use the Reveal tool to pull pixels from background elements and place them on the current plate.

Patch repair - Denoise, Grain, Multiply nodes
I removed the old man from the first part of the footage using FrameHold and a patch.
Note 1: When a roto'd section of a frame is freezeframed, the grain will be static while the animated parts will have moving grain. As a result, when we have frozen sections, we should reintroduce moving grain.
Note 2: The quantity of grain varies based on the scene's luminance. Grain will be less in brighter parts than in darker areas. To match the grain, we should view the footage on different channels.
Note 3: Since blue is the least light-sensitive channel, it usually is the noisiest.
Node graph of the above project
.png)
Week 10: Complex Cleanup
Carrying on from the last week, we practised more clean up workflows this week. We were given two exercises to work with advanced cleanup techniques and methods.
Exercise 1: Clean out the crowd
<- Before
After ->
Screen capture showing the workflow (video)
Planar Track
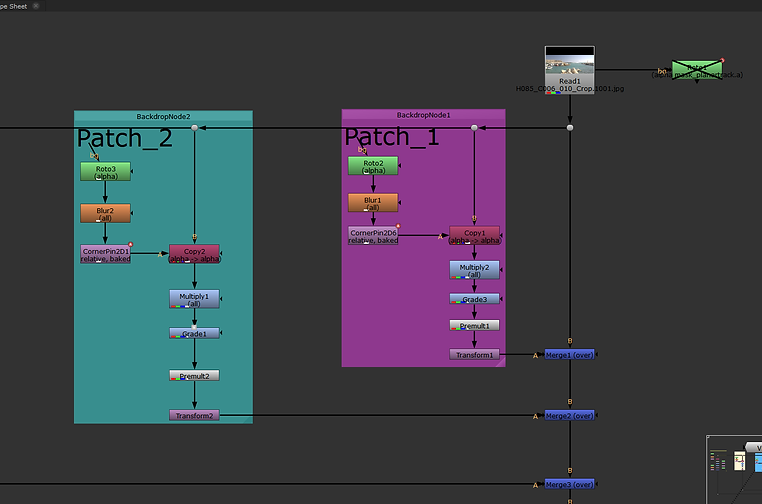
I used a planar tracker to track a particular shape/pattern and create a CornerPin2D node as below:
.png)
Node Graph
.png)
Exercise 2: Removing a boat and replace it with moving water
<- Before
After ->
Screen capture showing the workflow (video)
Planar tracker
For this scene, I created a planar tracker as below:
.png)
Node graph
.png)
.png)
.png)
Personal Research:The concept of Premultiplication in Nuke
I researched the internet about what exactly the "matte" mode within the Merge node is and when to use that. I once used "matte" for the sky replacement via Luma key during week 4 (Basic Keying). Below are a few handy links to resources on the subject of Premultiplication, Merge operations, and matte mode. Basically, matte is similar to "over", but with an unpremultiplied A input. Matte premults A for us. With over, our A input must be premultiplied.
What is Premultiplication?
Amazing explanation by JOEY KORENMAN from School of Motion on behalf of Foundry: Click Here.
Merge Operations
A good resource about all the operations within the Merge node: Click Here.
Concept of Premultiplication (two short and useful Youtube videos)
Week 11: Key Skills Recap
This week, we recapped some of the most important things we have learned so far. To do so, we did 2 class tasks to exercise and recap the main points of them.
Task 1: Logo Removal and Replacement
<- Before
After ->
Node graph
.png)
Task 2: Greenscreen
<- Before
After ->
Node graph
.png)
Assignment 1
For the assignment, we were given a shot to work on it as below:
1. Matching the reference video which can be found in quicktimes folder. This will show our skills in Nuke, our ability to be accurate and layout scripts in a professional manner.
2. Secondly develop the first shot by being creative. What can be done to this shot that makes it interesting and shows off our artistic skills.
Development #1
Development #2
Development #3
Development #4
Development #5
Development #6
VFX Breakdown
Video with sound:
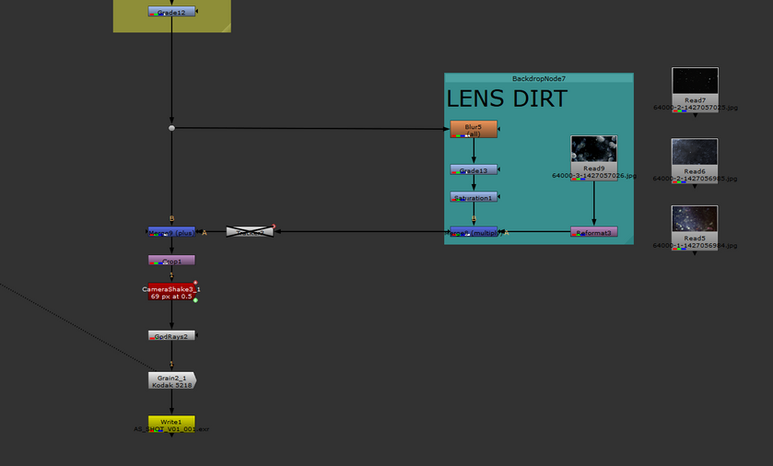
Node graph
.png)


