Character Animation
Week 1: Introduction to 3D Animation, the bouncing ball
We learned the fundamentals of keyframe animation in Maya during the first lesson of the module. We came to grips with the fundamentals of keyframing and utilising graph editor. By keyframing, we animated objects by selecting them and setting keyframes. Keys specify the property values of an object at a particular time. For example, to set a keyframe on a ball at the current frame, we select the ball and go to Key -> Set Key (or just hit S on the keyboard). Instead, we can also go to Channel Box or Attribute Editor and keyframe an attribute or a bunch of them.

Graph Editor
Maya Graph Editor is a graphical representation of interpolation between animation keys. By Graph Editor, We can easily manipulate animation curves and keyframes in our scene.

Graph Editor makes us able to control animation in a much more precise and visual way.

The bouncing ball
Creating a ball bouncing up and down in Maya.
Creating a bouncing ball moving across the ground.
Week 2: Ball Rig & the Obstacle course
This week, we looked at control rigs and animation interfaces. Then, for practice, we tried to animate a ball (with a ball rig) bouncing around and colliding with some objects in the environment.
Control rig
A control rig is a set of animation controls, including coloured NURBS curves, that serve as a visual interface for animation. In VFX, Rigging is the technique of constructing the bone structure of a 3D model. This bone structure can be utilised to animate the 3D object by manipulating it like a puppet.

Ball rig
In the outliner, we can see a list of the ball control objects. ball_placement_ctrl is used for setting up overall placement. ball_move_ctrl will be used to animate the position of the ball. ball_rotate_ctrl can be used to animate the spin. ball_top_ctrl and ball_bottom_ctrl are used for Squash and Stretch on the rig. ball_deform_rotate_ctrl allows us to rotate our deform controls to offset our squash and stretch.
.png)
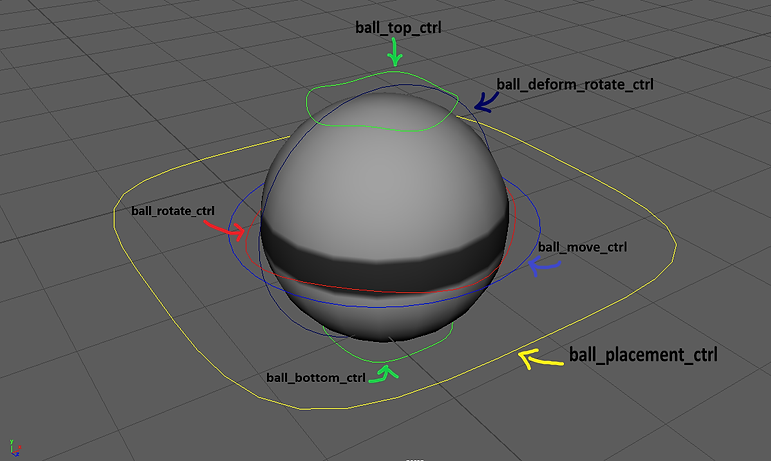%20-%20Copy.png)
Task: Obstacle course
Week 3: Arm rig and Flour Sack
This week, we came to grips with making a basic hand rig using basic poly cubs and creating a hierarchy for motion. To do that, we set up the pivot correctly and worked with Maya's parenting tools. In the second part of the lecture, we worked on a flour sack advanced rig to animate it by moving/rotating the rig controllers in a way that seemed natural and appealing.
Created basic cubs, parented them to make a hierarchy.

It is crucial to expand the tree and select all the children when rotating the hand. Note: to expand all branches of a tree in the outliner, hold down shift and click on the + sign of the main parent.


Modify -> Search and Replace Names... it searches names for the string specified in Search For and replaces the named string with the string specified in Replace With.

Select all the objects and go to Modify -> Freeze Transformations. This will 'Zero' out all of our cubes' transformations, ensuring that they behave appropriately when animated.

Modify -> Prefix Hierarchy Names... adds a prefix to the name of the selected parent object and all its children


Here I replaced the L prefix with R.
First grouped the left-hand tree, then mirrored it with Duplicate Special tool.


This is the hierarchy I created to make use of as a basic rig for my hand.

Note: if I select the first parent in the tree, I can rotate around that parent. To rotate all the objects I need to select all of the children, not just the parent.

Selected all the children and objects in the tree to rotate the whole rig.
Flour Sack animation (playblast)
Week 4: Inverse Kinematics

We got back to the basic character and rig we made last week to help us gain an understanding of Inverse Kinematics as opposed to Forward Kinematics. With Forward Kinematics (FK), to pose a character, we must rotate each joint separately until the required position is achieved. For instance, to move a hand, we need to rotate many arm joints. With Inverse Kinematics (IK) though, we can add an extra control structure, called an IK handle, to pose and animate an entire joint chain.
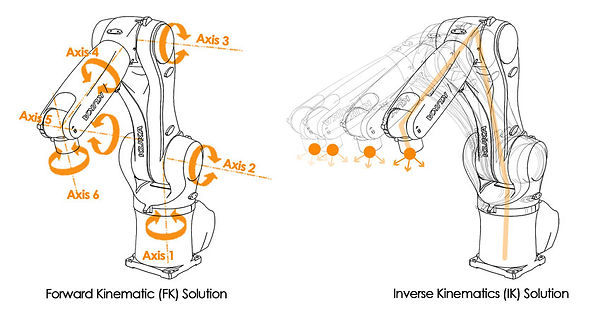
To put it simply, IK refers to how the movement of the child node affects the position and orientation values of all the parents. FK refers to the effect on the child nodes when the parent moves or rotates.
Continuing from the basic character we made last week, I made legs for my character.

Before starting creating joints, we need to turn on "X-Ray Joints" under the Shading menu of the viewport, to make us able to see the joints.

It is better to enable ambient occlusion in the viewport by heading to Hardware Renderer settings.

Go to the Skeleton menu and select Create Joints.
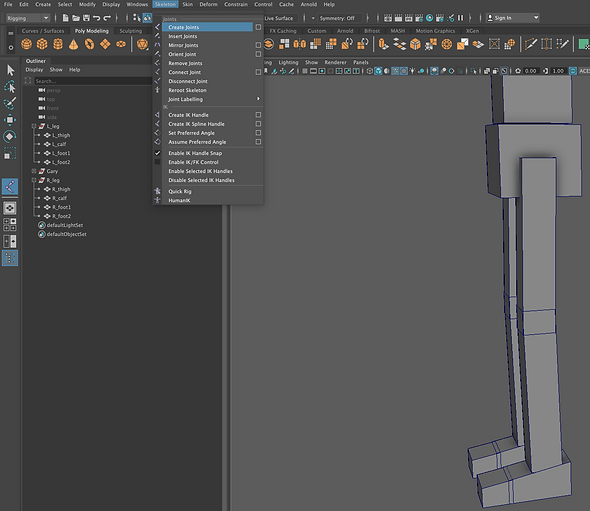
Joints made. Note: we need to go to an orthographic view in order to create joints precisely.

Note: if we find joints size too small or big, we can change the size by heading to Display -> Animation -> Joint Size

I made the left foot joints and then used the Mirror Joints tool to duplicate the joints for the right foot.

To create constraints for parenting, head to Constrain -> Parent.
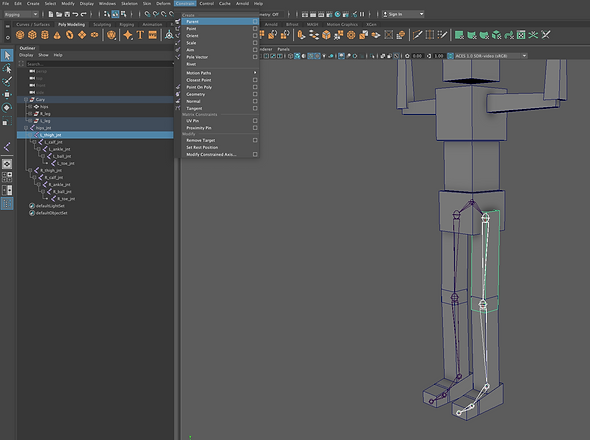
Also made a joint for hips and connected it to the legs by middle-mouse drag (parenting). Look at the hierarchy.

Note: make a display layer from the geometry to make them unselectable when working with joints. Set the display layer to R (reference)

Made IK Handles for feet, balls, and toes each separately. To do that, first, select the parent joint then the child joint and go to Skeleton -> Create IK Handle
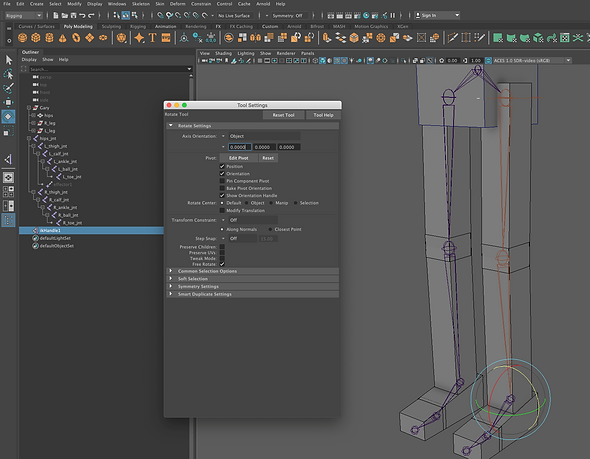
Moving the leg with IK Handle. We can easily zero out the IK handles, but we could not zero the joints out.

Made more ikHandles.

It is essential to enable stickiness for IK Handles, as they are all disabled in default when creating them.

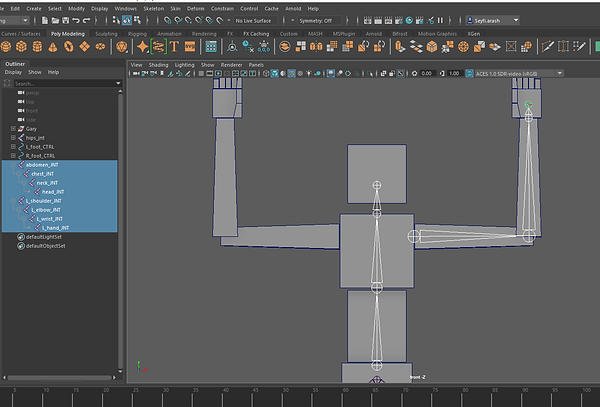
To be able to easily move and rotate feet, I made circles as simple controllers and parented them to the ikHandles.

The position of pivot points of the circles is important.

Moving on to the next level, I tried to make the joints and the controlling shapes (circles) for the top part of my character.
.png)
.png)
.png)
Result
A render
Week 5: Posing and ‘Head turn’
This week we kept working on the cube man and the rig we built over the prior sessions. We looked at different approaches to figure out how to use our rig in Maya to create dynamic animation poses.
Playblast render of my animation
My animation
Pole vector constraint
The end of a pole vector is forced to move to and follow the location of an object when it is constrained to that by a pole vector constraint.

Constraints of my ball
I created 3 locators, one for the ball, one for the floor, and the other for the hand. The ball follows "ball locator". I have constrained the ball locator to both the floor locator and the hand locator (which is in a group to be able to offset the hand locator and change the position of the ball when picking it up). I keyframed these two constraints to move the ball with the hand. Watch the below video:

Hand offset
Adding more realism
Assignment 01: a bouncing ball
For assignment 1, In Maya, I created a bouncing ball animation to demonstrate an understanding of fundamental keyframe animation techniques and weight mechanics. In addition, I wanted to depict the bouncing ball in an environment where the ball interacts with other objects; for this, I made use of Quixel Bridge, Substance Painter and After Effects along with Maya.
Arnold render
How I made it (screen captures)
.png)
.png)
.png)
Week 6&7: Walk & Lifting Weights
We looked at walk cycle and lifting weights techniques and workflows this week. We were given a rigged character and tried to get it to walk and lift objects. We also explored Animation Layers to create and blend multiple levels of animation in our scene and Maya Time Editor to loop our animation.
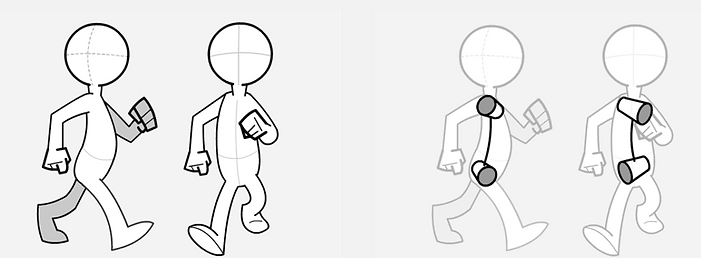
Walk cycle references
.png)
.png)
.png)
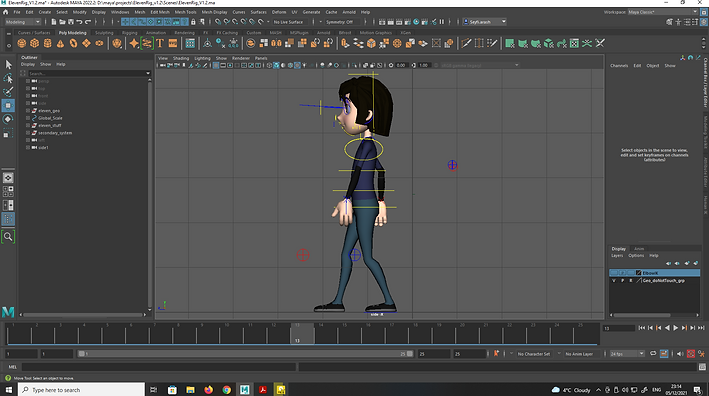
My walk cycle (main keyframes: contact & passing poses)
.png)
.png)
.png)
.png)
.png)
Animation Layers
Various levels of animation can be built and blended in a scene using animation layers. Layers can be used to organise new keyframe animation or to keyframe on top of an existing animation without overwriting the curves. Each layer contains animation curves for controls that have been added to it. We can manipulate the weight of each layer, as well as the mode of them. There are two main modes for animation layers that affect how the result animation is calculated: Additive and Override.

To learn more about Maya Animation Layers modes, click here.
Maya animation layers - workflows and techniques (Youtube video)
My walk cycle (playblast)
Maya Time Editor
To open Time Editor, go to Windows -> Animation Editors -> Time Editor. We can edit/blend different tracks of animation via Maya Time Editor.
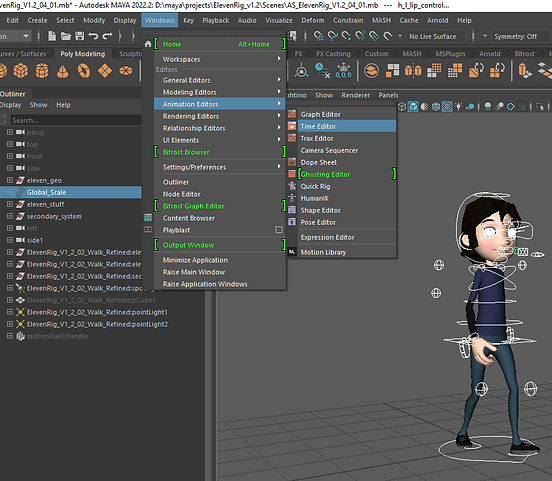.png)
Selecting all the rig controls, press "Add selected content from the scene".
.png)
Duplicated my short walk cycle to make it longer. Right-click and select Relocate -> Match Relocation to match our two clips.
.png)
Matching options.
.png)
Part two: Weight Lift
We also got the hang of how to animate our character to get it to lift objects. We learnt two approaches, both a bit technical and advanced, albeit very useful. I practised both methods and put the videos below.

Method #1: parenting only
Method #2: parenting and constraints
Week 8&9: Rig Recap/Jump + Animation Reference/Rotoscoping
Rig Recap tips and hints
We can set Arm IKs to either chest or global. If set to the chest, arms will follow the chest when moving the character around. This is particularly useful when doing a walk cycle. For lifting weight though, we better use the global option to be able to move the hands and the body separately and independently.
.png)
Opening and closing the hand by manipulating hand controls.
.png)
Modifying the face and character appearance.
.png)
Getting the character to smile or frown by modifying lip controls.
.png)
Opening and closing the mouth by manipulating the jaw control.
.png)
Changing the direction of eyes to get the character to look at different angles and directions.
.png)
Setting the Blink attribute
.png)
Jump references


Animation reference and rotoscoping
Rotoscoping is a technique for viewing a video in real-time when animating so that each frame of the animation can be synchronised to the video in the background. Rotoscoping can help us make believable motions when animating a character.
History of Animation - Rotoscoping (Youtube video)
Rotoscoping workflow in Maya (video by me) - PolyPlanes
Another method: Image Planes
.png)
.png)
Missing files? Introduction to Maya Patch Editor
Our textures may not be loading properly because the project hasn't been set correctly or because the texture files are in a different location than Maya expects. To deal with this, we might utilise Maya Path Editor. This tool displays all of the Maya scene's directory paths for references, textures, audio nodes, and image planes, so that we can repath our files.
.png)
Week 10: Cameras and Animatics
We investigated the cameras' focal length (angle of view) and depth of field settings in Maya and techniques to block out an animatic this week. We also looked at how to load an audio file into our scene Maya.
Focal Length (angle of view)
To learn more about focal length settings in Maya click here.
Depth of Field
To set up the depth of field, we need to know the Focus Distance which is the distance from the camera to the object we want to keep that in focus. There are two ways to measure the focus distance, as shown below:
Method #1: Distance Tool
.png)
Method #1: Heads Up Display (Object details)
.png)
Need to learn more about adjusting DoF settings? Click here.
Animatics - create Pose to Pose blocked animation
Maya employs the "Auto Tangent" type by default for our animation, which results in smooth motion or interpolation. However, in case we want to make a blocked animation moving from Pose to Pose, we need to change the tangent type from Auto to In = Linear and Out = Stepped. See below images:
.png)
.png)
Assignment 2: Character Animation
For this assignment, I created an animation of the eleven rig character moving and acting with personality while utilizing some of the animation principles I have learned so far, such as anticipation, secondary action, identifiable poses, timing, and so on.
Maya Hardware 2.0 render
Screen capture (how I made the animation)
Week 11: Lip-Sync and Viseme Blocking
We explored different eleven-rig controls for facial animation learnt how to utilise them to create the required viseme shapes for speech. Phonemes and Visemes are the terms widely used in the field. Phonemes are the phonetic sounds necessary for speech, while Visemes refer to the visual representations in 3D required to form the phonemes. What we do is, block out a dialogue to separate viseme shapes and try to capture them in our animation. We call this process viseme blocking.
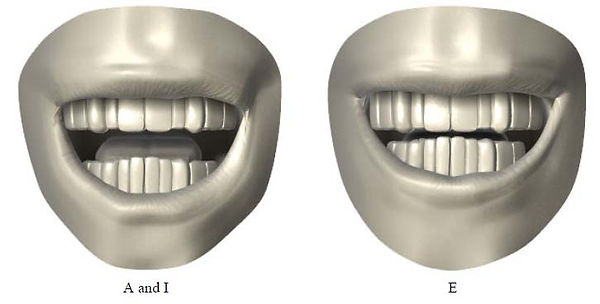


Important Eleven Rig's Controls for Speech
.png)
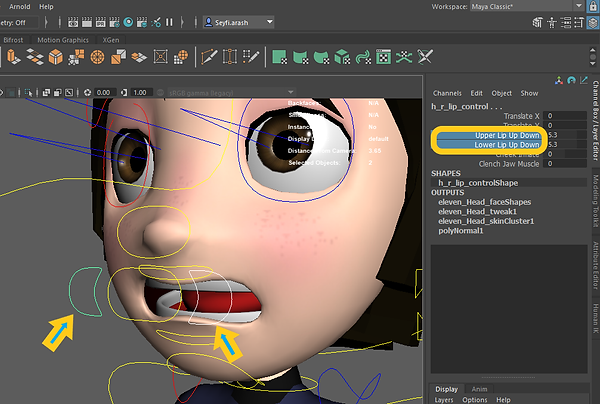.png)
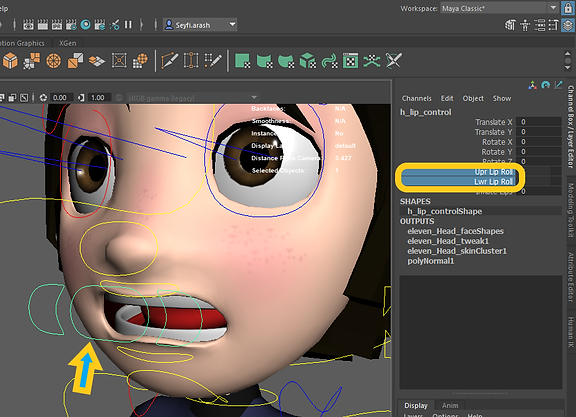.png)
Creating Selection Sets
.png)
.png)
Week 12: Camera’s & Shot Sequencing
The Camera Sequencer is one of the exciting features recently added to Maya, which acts like a video editor. We got a feel for what Maya Camera Sequencer does this week. To get more information on it, click here.

